
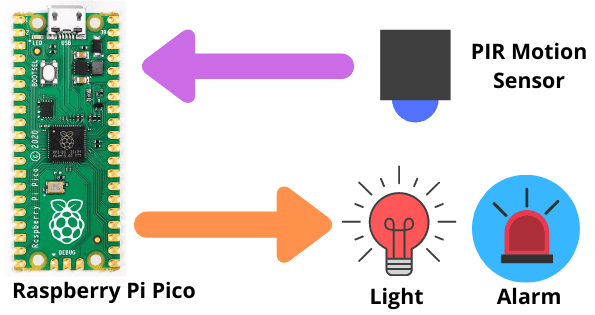
Configuring Motion Sensor with Raspberry Pi Pico
The Raspberry Pi Pico has various GPIO pins which we can use as input or output. It is can be easily done by configuring the GPIO in the codes. In this tutorial we will learn to interface a motion sensor with Pico board. We will use python code to configuring Motion Sensor with Raspberry Pi Pico. Before we jump into this tutorial, if you are new then you can get the basics of the Raspberry Pi Pico in our Raspberry Pi Pico Set Up Guide.
Raspberry Pi Pico is really good for micro python based standalone projects. It is much more faster then Arduino.
Things Required
Below components are required to build the project
- Breadboard x 1
- LED (Any Color) x 1
- Resistor 330 Ohm x 1
- PIR Sensor x 1
- Jumper wires
Working
The Passive Infrared (PIR) sensor will detect the motion and it will trigger the LED and buzzer for audio indication. Passive Infrared sensor is commonly used in home security systems. This is a simple project which will perform as a motion sensor alarm.
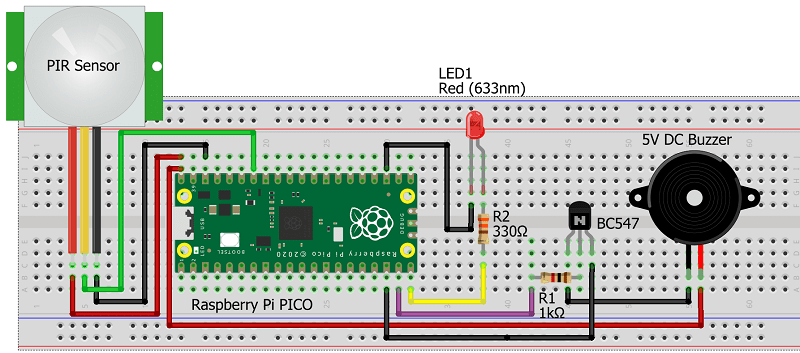
Breadboard Connection
The connection is simple on a Breadboard. You can also use a plain PCB and solder the components as per the diagram below.
Code Analysis
Below libraries help us to communicate with the GPIO and to control them.
import machine
import utime
Here LED is connected to GPIO 15 of Raspberry Pi Pico which is physically pin 20 in the board. This is configured as a output pin.
led = machine.Pin(15, machine.Pin.OUT)
The PIR is connected to GPIO 28 which is physical pin 34 of Raspberry Pi Pico. It is configured as in input with machine.Pin.IN. We are also setting the Pico’s internal resistor to pull down. This will help Pico to read the value as zero, until PIR sensor triggers it. We are using machine.Pin.PULL-DOWN to configure it.
pir = machine.Pin(28, machine.Pin.IN, machine.Pin.PULL_DOWN)
For configuring the buzzer we have connected it with GPIO 14, which is physical pin 19 of raspberry Pi Pico. It is set as output pin.
buzzer = machine.Pin(14, machine.Pin.OUT)
To ensure there is no false trigger of alarm at the beginning of the project we have placed the small delay. This also helps the sensor to settle down before it starts.
utime.sleep_ms(100)
An IRQ (interrupt request) is configured to trigger the pir_handler function. GPIO28 gets activated when the PIR triggers the signal.
pir.irq(trigger=machine.Pin.IRQ_RISING, handler=pir_handler)
Complete Code
You can download the code from the below link. Unzip it and open it using Thonny IDE. You can download if it is not installed and use this guide to upload the code using Thonny IDE using Raspberry Pi PICO.


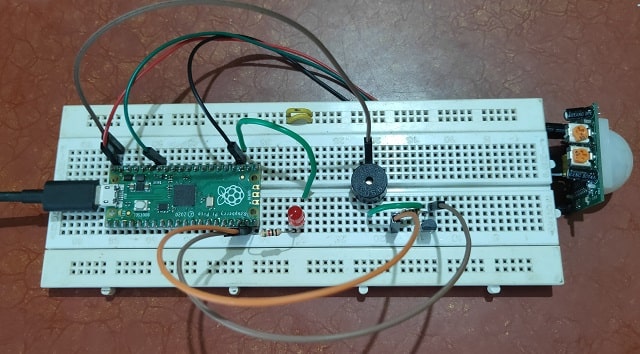
Building and Testing
Once you have connected the components as per the connection diagram and uploaded the code, Now its time to test it. To run the code in Thonny IDE just click on the Green Play button. Initially it will trigger the alarm and toggles the LED and buzzer on and off for sometime and then it will settle down.

Once you move near the PIR sensor it will trigger the alarm again and after a small delay of 10 seconds it will stop. This concludes your project is working fine.
Some More Projects:
- Weather Station with BMP280 Sensor and Raspberry Pi Pico
- IoT Pulse Oximeter Using NodeMCU MAX30100 & Blynk
- DIY Digital clock with RTC DS1307 and Raspberry Pi PICO
- IoT Security Camera using ESP32-Cam Blynk and PIR Sensor
- Reading built in Temperature sensor values of Raspberry Pi PICO
- ESP8266 based IoT Panic Alarm for Old Age People using Blynk
- How to send sensor data to Thingspeak using Raspberry Pi
- ESP32 based Gas Leakage Detection using Email Notification
- ESP32-CAM based Email Notification System
- IoT based Motion Detection Alarm using ESP8266 and Blynk
- IoT based Fire Security Alarm System using NodeMCU
- IoT Vehicle Parking System using ESP8266 and Blynk
- PIR based Motion Switch | PIR Sensor Light
- Smart Switch using Blynk | IoT Based WiFi Switch
- DHT11 based Temperature Humidity Monitoring IoT Project
- IoT Heart Rate Monitoring with ThingSpeak Platform
- Interfacing MQ2 Gas Sensor with Arduino
Summary
We have connected a PIR motion sensor with Raspberry Pi Pico. We have used micro python code in this project. Along with PIR sensor we have used a LED and a buzzer for audio visual indication of this motion alarm. Any beginner can build this project and start with micro python based projects. Hope you like this project and don’t forget to share this article with others.

