Controlling Devices with Raspberry Pi using Python
In this Raspberry Pi tutorial, we are going to learn about controlling devices with Raspberry Pi using python. A lot of people use Raspberry Pi to control devices. This post will show you how to control devices with Raspberry Pi. We will control the DC as well as AC devices. Controlling the AC devices is dangerous, as it deals with high voltage. So before controlling the AC device, we will see the controlling of DC device so that you have an idea of how the relay module is working. If you are a beginner in electronics, then we will recommend you to not follow the AC control part.
Relay Module
A relay is basically a switch which is operated by an electromagnet. The electromagnet requires a small voltage to get activated which we will give from the Raspberry Pi and once it is activated, it will pull the contact to make the high voltage circuit.
The relay module we are going to use is a 5V DC rely module and it runs on 5V. The Raspberry Pi can control the devices which runs on up to 3.3V so if we want to control the devices which runs on more than 3.3V or the A.C devices then we will have to use a relay module through which we can control A.C as well as DC devices.
Pin out of Relay Module
The relay module has total of six pins: three on one side and three on other side. On the bottom side, there are three pins which are signal or IN1, 5V and ground. We will connect these pins with the Raspberry Pi. While on the other side, there are NC (Normally close), C (Common) and the NO (normally open) which are the output pins of the 5V relay. There, we will connect the output device.
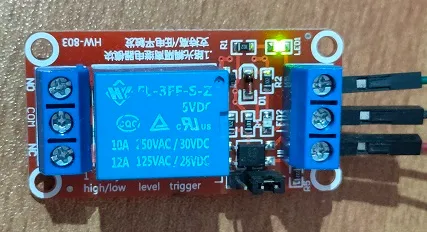
Normally open state (NO) VS Normally closed state (NC)
The relay module can be used in two states which are
- Normally open state (NO)
- Normally closed state (NC)
Normally open (NO)
In the normally open state, the initial output of the relay will be low when it will be powered. In this state, the common and the normally open pins are used.
Normally closed state (NC)
In the normally closed state, the initial output of the relay will be high when it will be powered. In this state, the common and the normally close pins are used.
Controlling DC devices using relay module
Firstly, we are going to control a led using the relay because controlling a DC device is easy as compared to the AC device and you will get an idea of how the relay module is working. For controlling the DC device, you do not require an external supply until you are controlling a small voltage device like LED which runs on up to 3.3V.
Circuit Diagram and Explanation
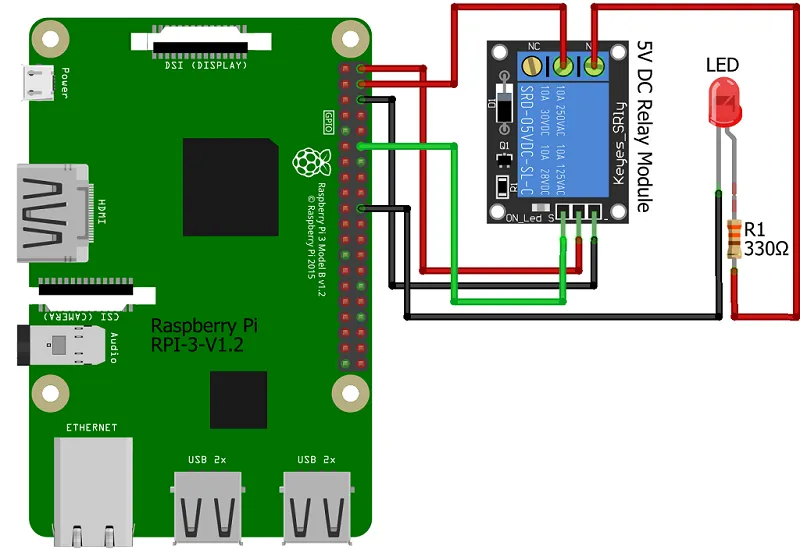
In this example, we will connect the relay module with Raspberry Pi in the normally open state. So, connect the 5V and the ground of the Raspberry Pi with the 5V and the ground of the relay module. Then connect the IN of the relay module to the GPIO 18 of the Raspberry Pi.
On the other side of the relay module, we will use the common pin and the normally open pin because we are going to connect the relay in the normally open state. Connect the common of the relay module to the positive lead of the LED. Connect the other pin of LED to the ground through the 330 ohm resistor.
In the end, make sure you have grounded all the LED’s (black wire from the resistors to the ground pin of Raspberry Pi).
Controlling AC Devices using Relay Module
Before going further, we must warn you that use of High Voltage can be dangerous if used incorrectly and it can cause serious injuries and we will not be responsible.
For the control of AC device, we will require an external source which will power the AC source. So, before connecting anything, make sure your Raspberry Pi is turned off.
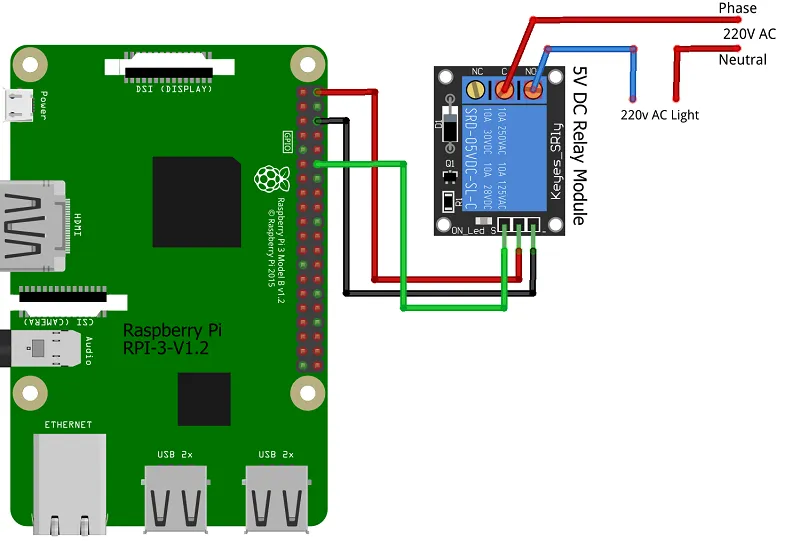
Now, connect the VCC, ground and signal pin of relay module to 5V, ground and GPIO18 of Raspberry Pi respectively. On the other end, connect one wire of the power plug to the one end of the bulb socket and the other wire of the power plug to the common (C) of the relay. Then connect the normally open (NO) of relay to the other end of the bulb socket.
Prerequisite
Since this webserver runs on python code, hence python is necessary. Raspberry Pi OS comes python preinstalled. If you find python is not present then you can use below commands to install python version 2 and 3 respectively on raspberry pi.
sudo apt-get install python2
sudo apt-get install python3
Python Code
You can download the code from below link. It is written by Henry Cheung. You open and copy this file in your raspberry pi. After creating this file, run it using below command. Provide a file name while saving the python file and use it while executing the python script.
python3 filename.py
Building & Testing
Finally after making the connection, its time to test the code. Power on the Raspberry Pi.
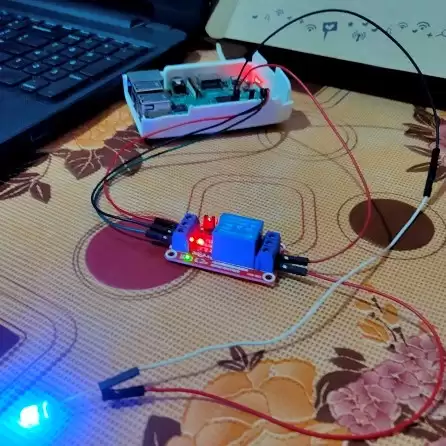
Login to raspberry pi using SSH or using terminal. Now execute the below command
python3 rpi_webserver.py
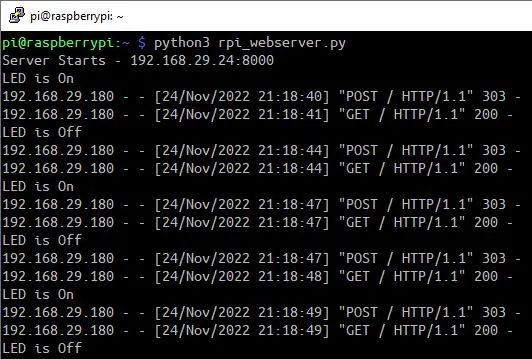
The webserver will start and you have to use raspberry pi IP address along with port 8000 to access the web dashboard as shown below.
http://<your_raspberry_pi_ip>:8000
Now you can access the led or any device connected with the relay module.

Summary
There are many ways to control devices with your Raspberry Pi. In this article, we have shown you controlling devices with Raspberry Pi using Python. First, we will need to connect the relay module with pi and install the Python software if it is not present. Once the setup is ready, we can begin to control devices using Python dashboard easily. If you like this tutorial then please don’t forget to share it with others.
Related Projects:
- IoT LPG Gas Detection with Blynk 2.0
- Building Node-RED Dashboard with DHT11 Sensor
- IoT Smart Plant Watering System Project
- Monitoring Weather Data using BMP280 and Blynk 2.0
- Web Server Pulse Oximeter using NodeMCU ESP8266
- Getting Started with Arduino IoT cloud using NodeMCU and DHT11
- Weather Station with Raspberry Pi PICO and DHT11
- Controlling a servo motor using Raspberry Pi Pico
- Configuring BMP280 Sensor with Raspberry Pi
- Weather Station with BMP280 Sensor and Raspberry Pi Pico
- IoT Pulse Oximeter Using NodeMCU MAX30100 & Blynk
- DIY Digital clock with RTC DS1307 and Raspberry Pi PICO
- How to send sensor data to Thingspeak using Raspberry Pi
- ESP32-CAM based Email Notification System
- ESP32 based Gas Leakage Detection using Email Notification
- IoT based Motion Detection Alarm using ESP8266 and Blynk
- IoT based Fire Security Alarm System using NodeMCU
