Configuring BMP280 Sensor with Raspberry Pi
For IoT related projects we use several sensors. In this article we are going to learn configuring BMP280 Sensor with Raspberry Pi. The BMP280 temperature and barometer sensor can read and send both data. The BMP280 sensor is one of the most accurate and cost-effective sensors for measuring pressure and height. The BMP280 sensor is capable of measuring temperature, pressure and altitude.
Things Required
- BMP280 Sensor
- Raspberry Pi (3/4)
- Jumper Cables
BMP280 Sensor
BMP280 sensor has ability to measure temperature, pressure and altitude. The BMP280 module is one of the numerous electronic sensor modules that can detect and display several parameters simultaneously. On the silver sensor module is the GY-BME/P 280, which measures environmental parameters and sends data. This sensor measures pressure between 300 to 1100 hPa. It can measure the temperature between – 40 to + 85 degrees Celsius. The pressure measurement accuracy is ±1 hPa.
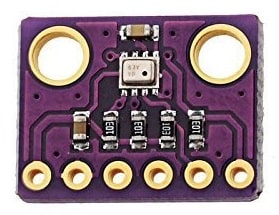
The average current consumption is 2.74 µA and in Sleep mode it is equal to 0.1 µ A. The resolution for measuring pressure is 0.01 hPa and for temperature is 0.01 °C. The operating voltage of the module is 3.3 to 5 volts DC. This module consumes very low power and its economical too. This sensor is suitable for making various gadgets for measuring pressure, temperature and altitude.
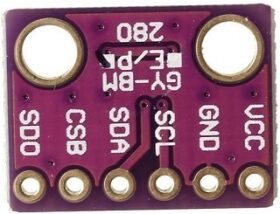
The BMP280 sensor gives the reading in Pascal (Pa) for pressure measurement. The unit of measurement of air pressure in meteorology and water level is hectopascals or millibars. It is written as hPa and equivalent to 100 pascals. Atmospheric pressure in the air is equal to 101325 Pa or equivalent to 76 cm Hg.
Keep in mind that air density decreases with increasing altitude, which is a characteristic of air pressure. Air density also changes with temperature and humidity. Normal sea level hpa per MSL Atmospheric pressure in the air is equal to 101325 Pa or equivalent to 76 cm Hg. Keep in mind that air density decreases with increasing altitude, which is a characteristic of air pressure.
Raspberry Pi
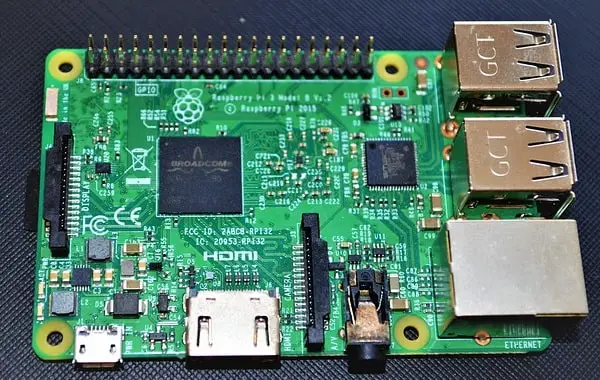
The Raspberry Pi board has introduced version 4 and the Raspberry Pi 400 board by 2020, and has made major changes to each version. The Raspberry Pi board is always the same on the GPIO pins. There has never been much difference in the performance. Selecting the Raspberry Pi type is optional in all site projects and is compatible. In this tutorial, Raspberry Pi 3 models A Plus have been used. Some of the features of this board are attached below.
- It has a Broadcom BCM2837 64bit Quad Core Processor
- It has 1Gbytes DDR2 Memory
- It has a 1.2 GHz processor
- It has Bluetooth 4.1
- It has Wi-Fi 5GHz IEEE 802.11 b/g/n/ac wireless LAN
- It has 40 GPIO pins
Connecting BMP280 sensor with Raspberry Pi
In this project the sensor will collect temperature and pressure. This sensor module can be interfaced with SPI and I2C communication protocol, considering that only I2C pins are printed on the module, we are using I2C protocol in this tutorial to set up the BMP280 sensor with Raspberry Pi.
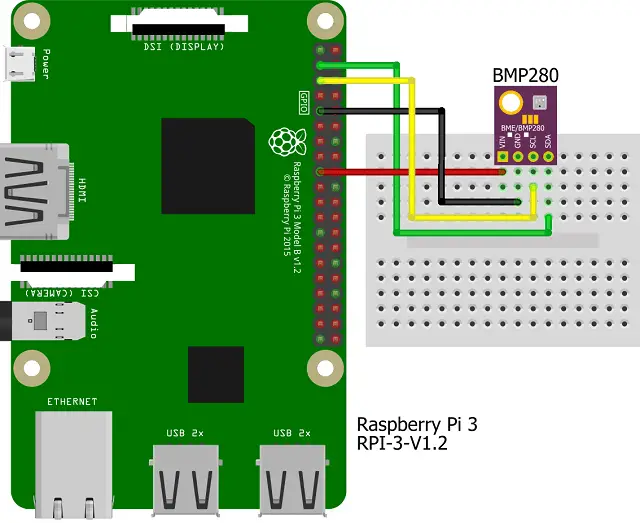
The BMP280 module has 6 pins, of which we will use only four pins for I2C communication.
- VCC pin connects to the PIN 17 on the Raspberry Pi board.
- GND pin connects to the PIN 9 of the Raspberry Pi board.
- SCL pin connects to the (GPIO3) PIN 5 of the Raspberry Pi board.
- SDA pin connects to the (GPIO2) PIN 3 of the Raspberry Pi board.
Installing BMP280 Libraries or Packages
BMP280 sensor suitable for measuring the environmental Temperature and barometric pressure. To measure these parameters we need to install some libraries. We use Pypi to get this library. Pypi stands for python package index and its a repository for Python software. Pypi helps you find and install software developed and shared by the Python community.
Now login to your Raspberry Pi and open the terminal.
Copy and paste the below command
sudo pip install bmp280
Now run the below command to get the folders from GitHub
git clone https://github.com/pimoroni/bmp280-python
After installing the package, install the following commands in order
cd bmp280-python

sudo ./install.sh

cd examples

Now in examples run the command ls to list out the python code examples.

We are going to run temperature and pressure.py to measure the temperature and pressure. For executing it just run the below command

python temperature-and-pressure.py
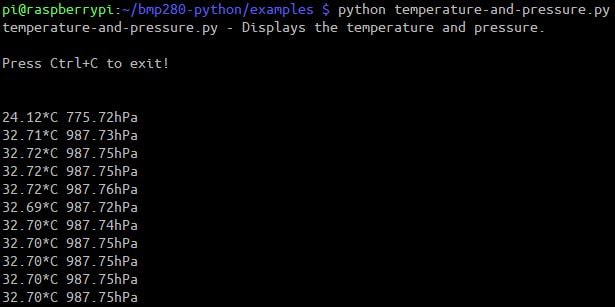
To get the output, please make sure connections are done. As you can see in the image, the data is displayed after entering the command python temperature-and-pressure.py. Both data temperature and Pressure are sent and displayed simultaneously with a small delay.
Modified Python code for measuring pressure and temperature
You can modify the existing code and format the output in a nice structured way. Run the below command to open the file in a editor
![]()
Then you will see the code. You can download the code and paste it as shown below.
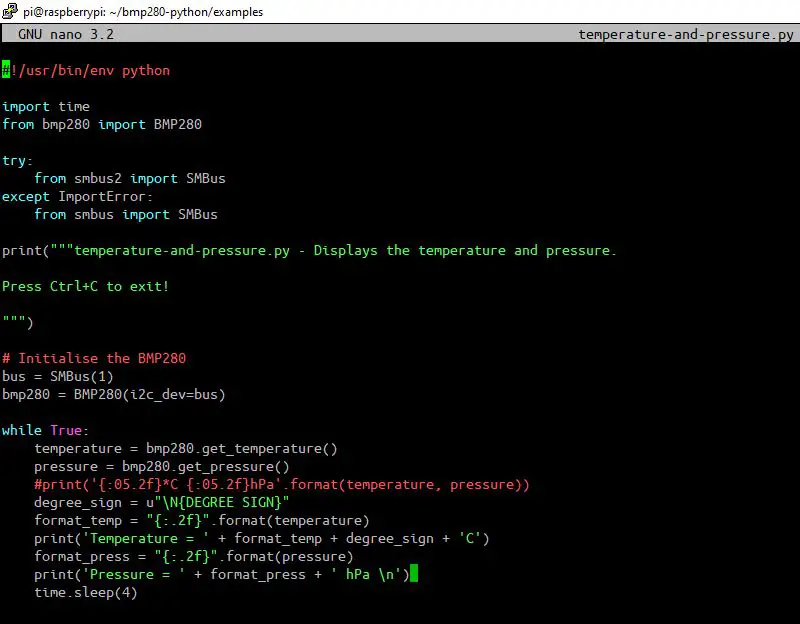
Python code BMP280 measures and displays sensor temperature and pressure. To run this code, you can use the default Python software installed on the OS. In this section, I have used Thonny software.
#!/usr/bin/env python

import time
from bmp280 import BMP280

try:
       from smbus2 import SMBus
except ImportError:
       from smbus import SMBus

print("""temperature-and-pressure.py - Displays the temperature and pressure.

Press Ctrl+C to exit!

""")

# Initialise the BMP280
bus = SMBus(1)
bmp280 = BMP280(i2c_dev=bus)

while True:
          temperature = bmp280.get_temperature()
          pressure = bmp280.get_pressure()
          degree_sign = u"\N{DEGREE SIGN}"
          format_temp = "{:.2f}".format(temperature)
          print('Temperature = ' + format_temp + degree_sign + 'C')
          format_press = "{:.2f}".format(pressure)
          print('Pressure = ' + format_press + ' hPa \n')
          time.sleep(4)
The SMBUS protocol is used to communicate between data transmissions. In modules with I2C interface, this protocol is used for data transfer.
bus = SMBus(1)
bmp280 = BMP280(i2c_dev=bus)
The following two functions are used to receive temperature and pressure data.
temperature = bmp280.get_temperature()
pressure = bmp280.get_pressure()
Testing
After setting up the project, now its time for testing it. The hardware is ready as shown below.
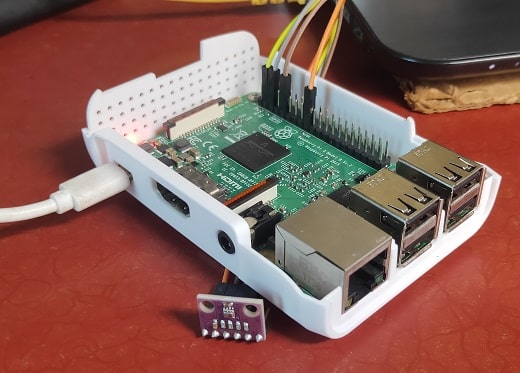
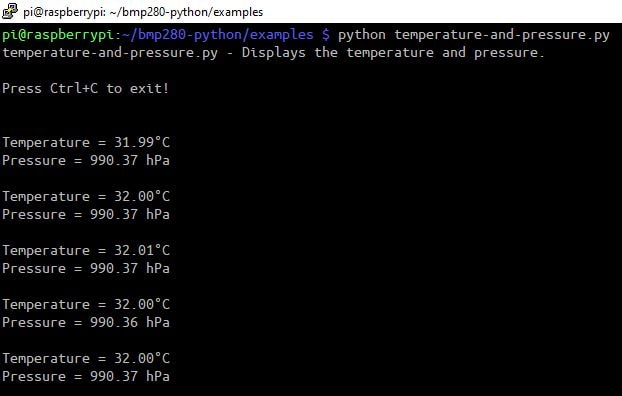
The program code is ready and you can run by running the same command. You will get a clean and structured output.
temperature-and-pressure.py
Some More Interesting Projects:
- Configuring Motion Sensor with Raspberry Pi Pico
- Weather Station with BMP280 Sensor and Raspberry Pi Pico
- IoT Pulse Oximeter Using NodeMCU MAX30100 & Blynk
- DIY Digital clock with RTC DS1307 and Raspberry Pi PICO
- IoT Security Camera using ESP32-Cam Blynk and PIR Sensor
- Reading built in Temperature sensor values of Raspberry Pi PICO
- ESP8266 based IoT Panic Alarm for Old Age People using Blynk
- How to send sensor data to Thingspeak using Raspberry Pi
- ESP32-CAM based Email Notification System
- Raspberry Pi Pico vs Arduino Which one to choose?
- ESP32 based Gas Leakage Detection using Email Notification
- IoT Heart Rate Monitoring with ThingSpeak Platform
- IoT based Fire Security Alarm System using NodeMCU
- Controlling ESP32 via Bluetooth using Blynk
- How to read DHT11 sensor data using Blynk
- Interfacing MQ2 Gas Sensor with Arduino
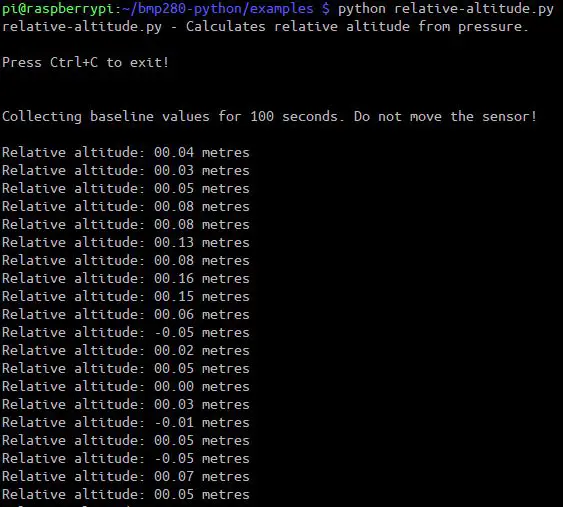
Python code to measure relative height
Its default program is included in the library to measure relative height. If you want to run through the command, do the following.
cd bmp280-python
cd examples
python relative-altitude.py
#!/usr/bin/env python

import time
from bmp280 import BMP280

try:
from smbus2 import SMBus
except ImportError:
from smbus import SMBus

print("""relative-altitude.py - Calculates relative altitude from pressure.

Press Ctrl+C to exit!

""")

# Initialise the BMP280
bus = SMBus(1)
bmp280 = BMP280(i2c_dev=bus)

baseline_values = []
baseline_size = 100

print("Collecting baseline values for {:d} seconds. Do not move the sensor!\n".format(baseline_size))

for i in range(baseline_size):
pressure = bmp280.get_pressure()
baseline_values.append(pressure)
time.sleep(1)

baseline = sum(baseline_values[:-25]) / len(baseline_values[:-25])

while True:
altitude = bmp280.get_altitude(qnh=baseline)
Summary
The BMP280 sensor has the ability to measure temperature and barometric pressure. Configuring BMP280 Sensor with Raspberry Pi is quick and easy. With the help of Pypi this tutorial is simplified. This tutorial examines examples of default library programs which can easily read and receive temperature and pressure data with these functions.
Hi,
I’m getting the following error:
pi@ChristmasPi:~/bmp280-python/examples $ python temperature-and-pressure.py
temperature-and-pressure.py – Displays the temperature and pressure.
Press Ctrl+C to exit!
Traceback (most recent call last):
File “temperature-and-pressure.py”, line 22, in
temperature = bmp280.get_temperature()
File “build/bdist.linux-armv7l/egg/bmp280/__init__.py”, line 194, in get_temperature
File “build/bdist.linux-armv7l/egg/bmp280/__init__.py”, line 180, in update_sensor
File “build/bdist.linux-armv7l/egg/bmp280/__init__.py”, line 166, in setup
RuntimeError: Unable to find bmp280 on 0x76, IOError
pi@ChristmasPi:~/bmp280-python/examples $
I did a copy and paste for the code. Didi I miss something?
Also how do I make a click to run button?
Thanks