Smart Doorbell using ESP32 Camera with Custom app
Door bell are used from several decades now. A traditional door bell is very simple to connect and use. In this era of communication we have developed and made our door bell smart. In this tutorial we will learn how we cab build a smart doorbell using ESP32 camera with Custom app. We are using firebase to build this custom app based IoT Door bell using ESP32Cam. This project is simple and effective. This also needs few components and it is easy to build by any beginner level hobbyist or student. Lets quickly see what are the components needed to build this project.
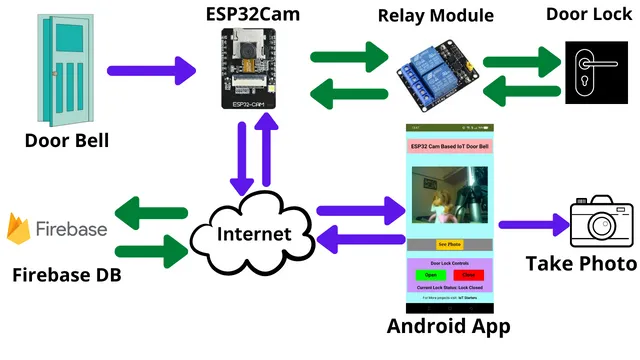
An IoT doorbell using an ESP32Cam could be a custom application that utilizes the camera and wireless capabilities of the ESP32Cam to allow a user to remotely view and interact with visitors at their doorstep through a smartphone app. The ESP32Cam would be connected to the internet and configured to send real-time video and audio to the user’s smartphone app, allowing them to see and hear the visitor, as well as remotely unlock the door if desired. Additionally, it may also have features like motion detection, image and video recording, integration with smart home devices, etc.
Parts List
Below parts are needed for building this project, You can click on the best buy links to buy the products which will help out channel to grow.
- ESP32 Camera Module (BEST BUY)
- Single channel Relay Module (BEST BUY)
- Resistor 1KΩ x 1
- Push Button Switch
- Jumper cables
- Breadboard (BEST BUY)
- Mobile charger 5V/1A as power supply
How it Works?
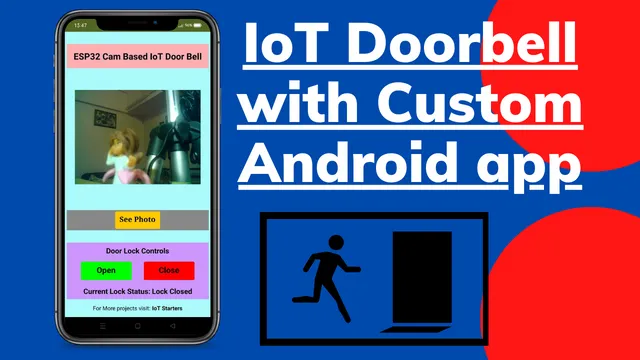
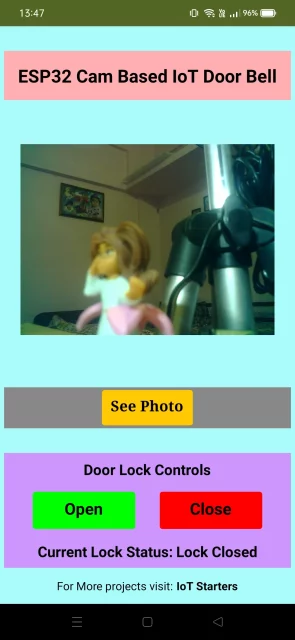
When anyone presses the call bell it send an notification to your custom android app installed on your smartphone. You can open the app and tap on Take Picture to take a pick of the person who is standing outside. After seeing the person you can open the door by tapping on the app. This is a simple but very effective project to build. The ESP32 camera resolution is good to take pics. It also has an addition flash to take the pictures in better way.
Connection Diagram
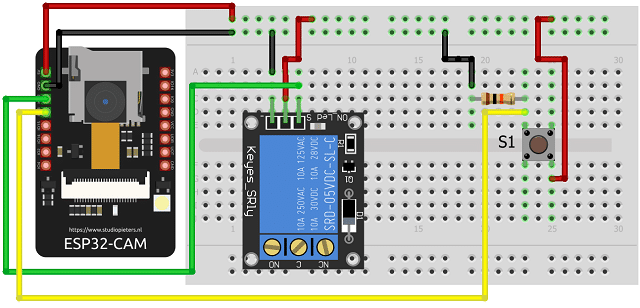
This project needs few components to build it. With few easily available components, you can build Smart Doorbell using ESP32 Camera with Custom app project. If you want you can also mount these components on a circuit board or design your own circuit board.
Arduino Library
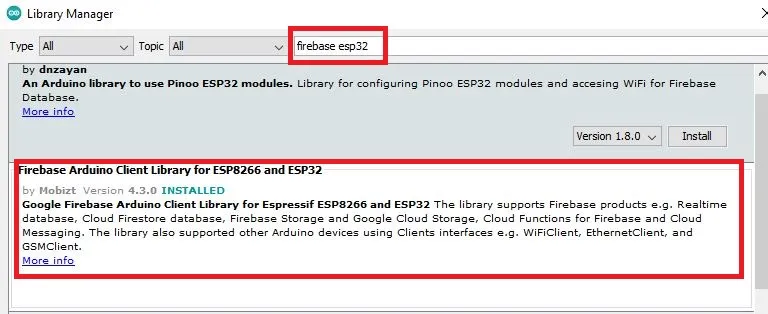
Go to Sketch > Include Library > Manage Libraries from the top menu. Type in firebase esp32 and install the below library. This library is meant for both esp8266 and ESP32.
Setting up Firebase Project
First login to Firebase and create an account if you are logging in for first time. Enter a name for your project.

As per your requirement you can enable google analytics or disable it and click on Continue. This is optional and doesn’t make any impact if you don’t enable it.
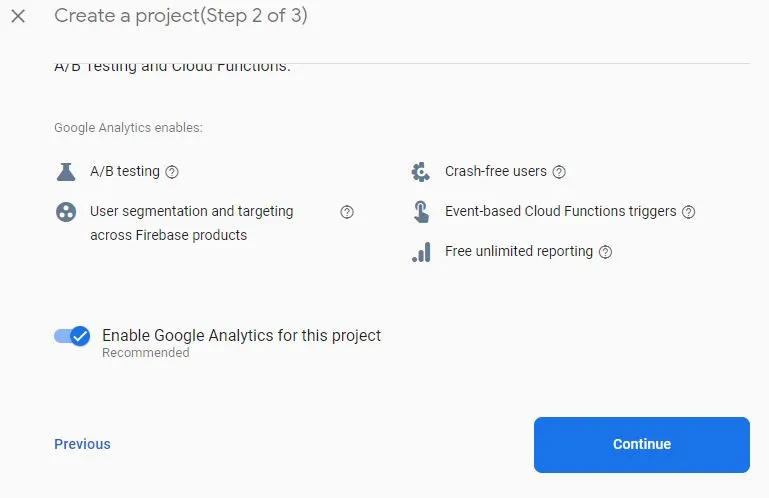
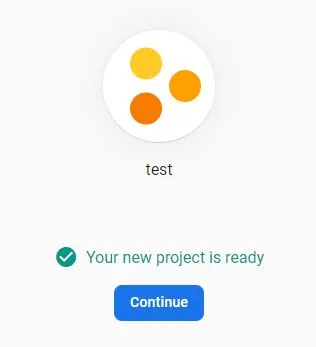
Now your project will be created in sometime. Then click on Continue.
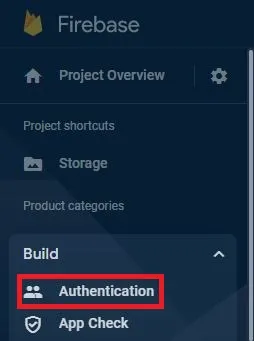
Setting up Firebase Storage Database
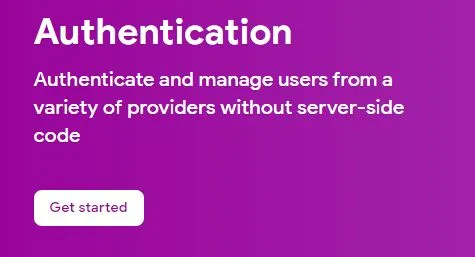
On left hand side click on Authentication
Now click on Get Started
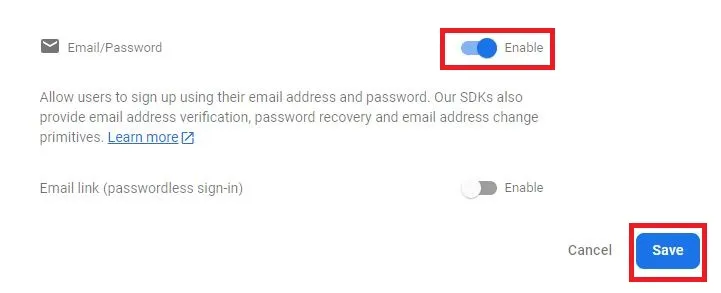
Select Sign-in method

Enable the Email/Password and click on Save
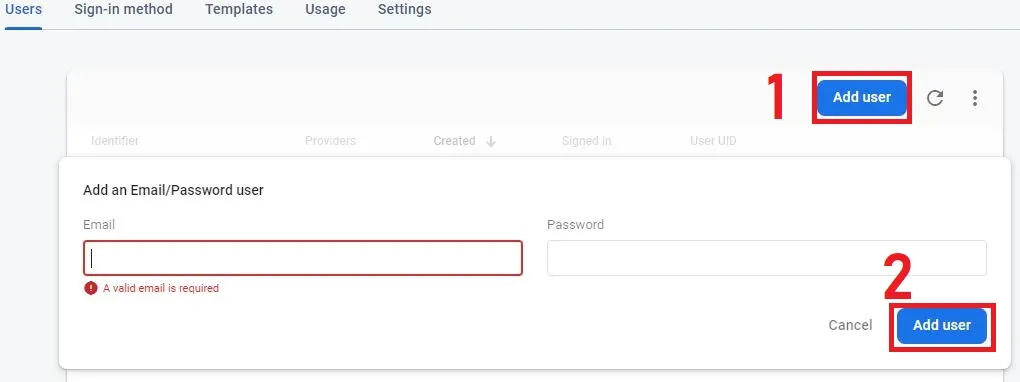
Go to Users and click on Add user, then enter an email id and password and click on Add user
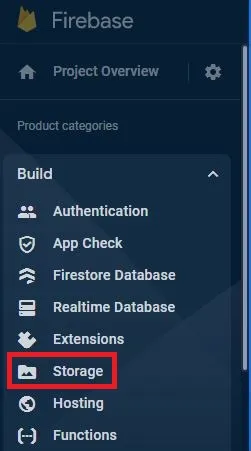
Now click on Storage
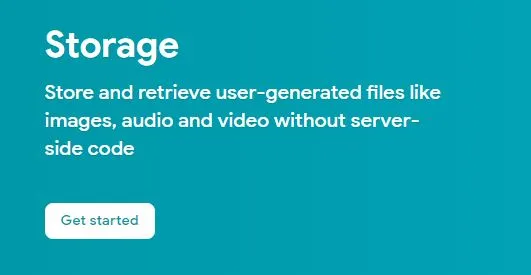
Click on Get started
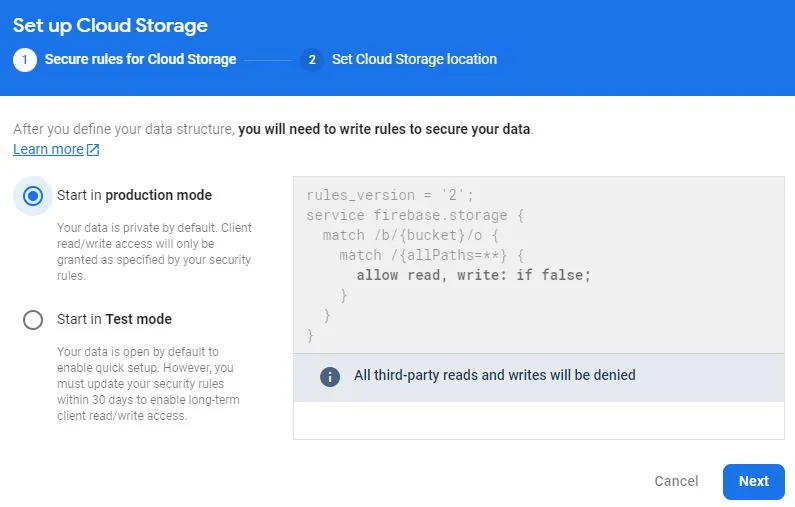
Select Start in Production mode and click on Next
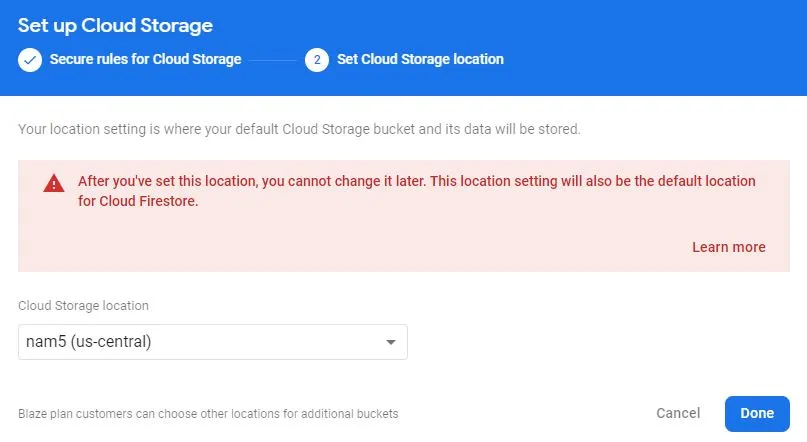
let the default storage location be there and click on Done
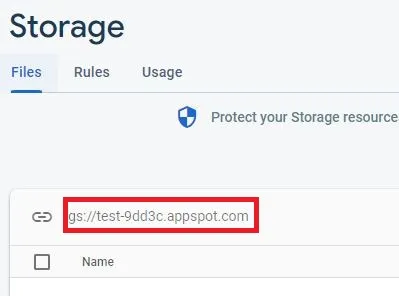
Now finally you will get the storage bucket id. Copy and keep it as we need to put in our Arduino code.
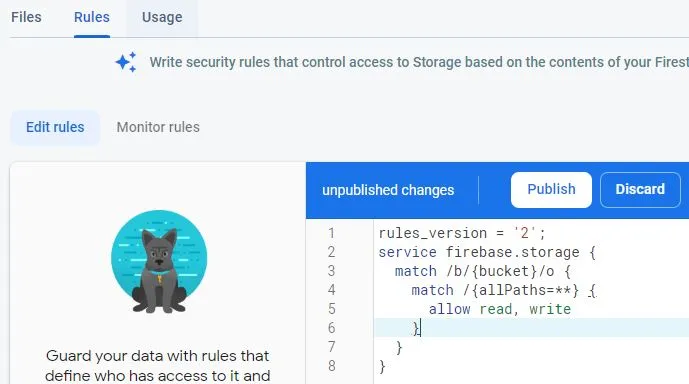
Click on Rules and change it as shown below and click on Publish
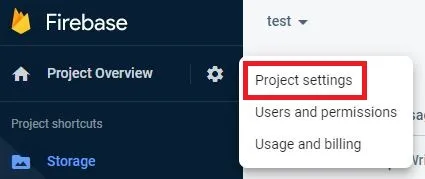
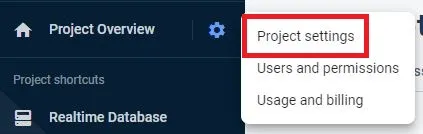
In n Project Overview click on Project settings
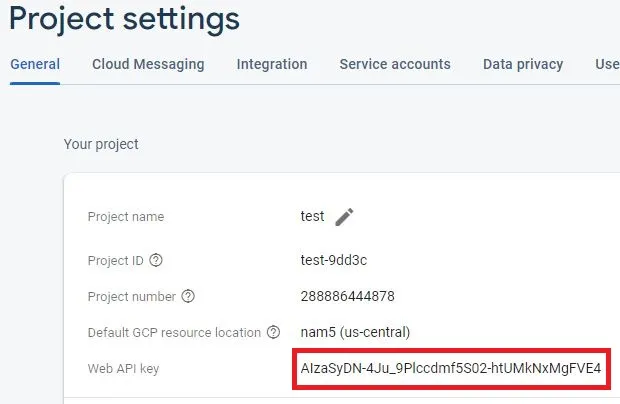
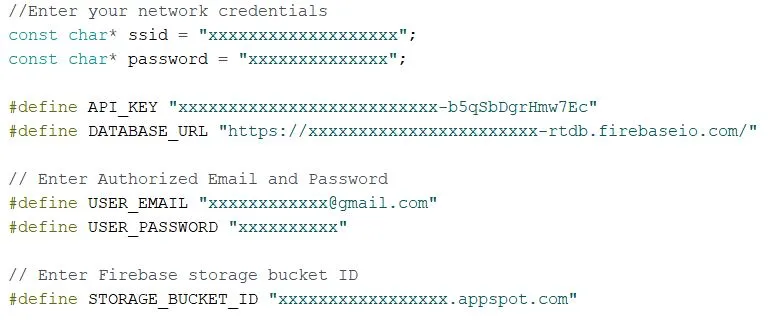
Now here we will see the Web API Key, Copy this key and keep it safe a we need this in our Arduino code.
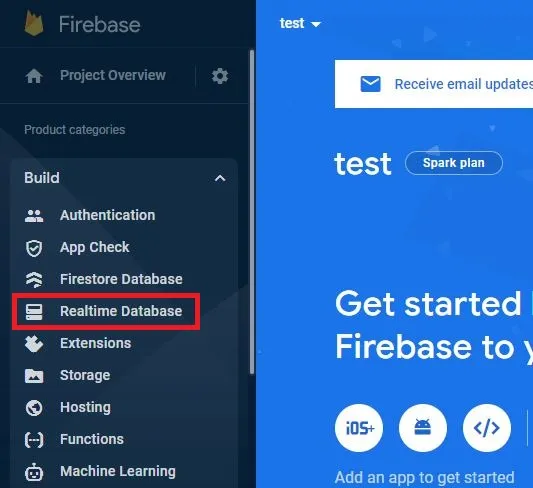
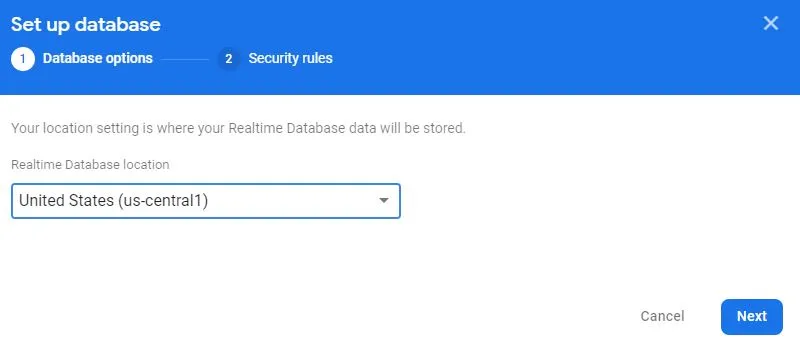
Setting up Firebase Realtime Database
Now click on Realtime Database to create it.
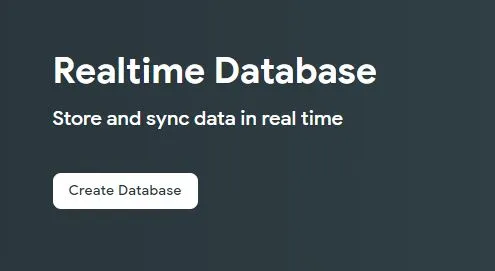
Click on Create Database to build it.
Let the default location be there for your Realtime DB and click on Next.
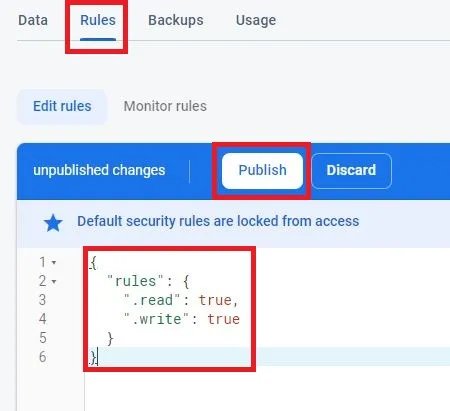
By default the locked mode will be selected. click on enable.
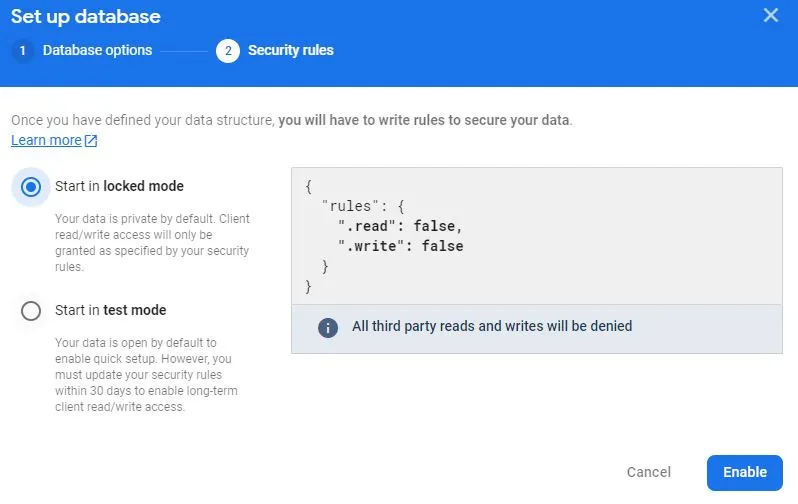
After enabling, click on Rules and edit rules. Make the read and write as true. Also click on Publish to save changes.
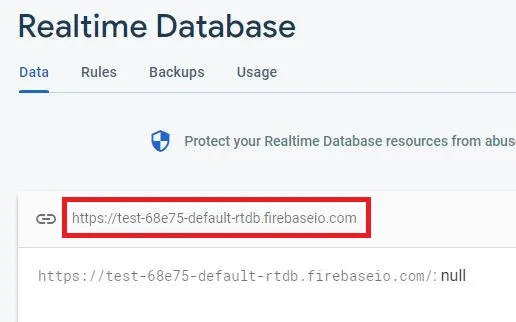
Click on Data to get the the URL of your Realtime database. Copy this and keep it in a notepad. We need this in our Arduino code.
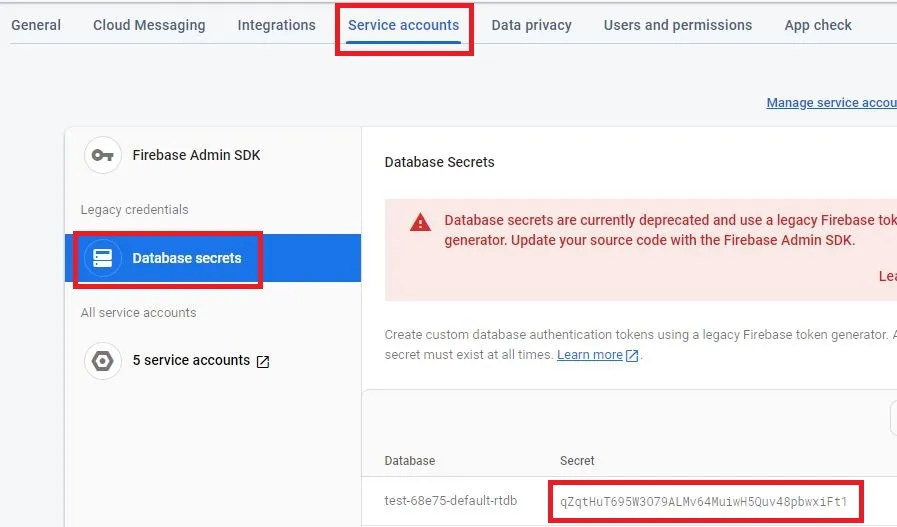
Go to Project settings and collect the required information.
Click on Service accounts and click on Database secrets to get the secret key to connect with your database. Copy and paste it in notepad as we need it in our Arduino code.
Code
We are using default code with some changes. you can get the default code form ESP32 examples. You can open the default code and delete it. Copy the code below and make necessary changes as marked.
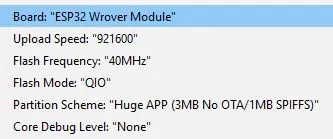
For uploading the code you can refer to this article.

Changes required in the code before uploading
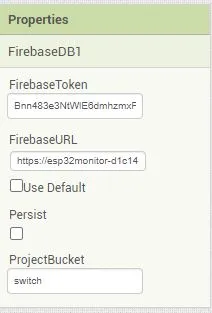
Creating Custom App
If you need aia file of this project, then drop us an email on startwithiot@gmail.com
Import it in MIT App Inventor. Before you create an apk file you have to make changes in the firebase DB as shown below.
Update the Firebase DB secret key in firebase token. Also ass the firebase URL which you have coped earlier along with the project bucket.
Building and Testing
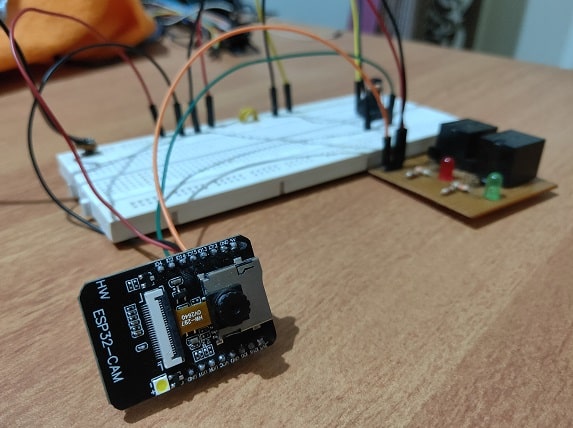
We have arrange all the components on a breadboard and connected it as per the circuit diagram.
Open the app installed and if we click on See Photo then the latest image taken will be reflecting. After seeing the picture you can either open the door and keep it closed. It takes 5 seconds to capture the photo and save it in the storage.
Suggested Projects:
- IoT Door Security with custom Android App using Firebase
- Raspberry Pi Pico with LCD & SSD1306 OLED Display
- Raspberry Pi Pico W web server with BMP180 sensor
- Controlling Devices with Raspberry Pi using Python
- IoT LPG Gas Detection with Blynk 2.0
- Building Node-RED Dashboard with DHT11 Sensor
- IoT Smart Plant Watering System Project
- DHT11 Sensor with ESP-NOW and ESP32
- Raspberry Pi Flask Web Server with DHT11
- ESP32 Web Server PWM based LED Control
- IoT Heart Rate Monitoring with ThingSpeak Platform
- Temperature Monitoring with ESP-DASH Webserver
Summary
Using ESP32 camera this a simple and nice project, which can be implemented at home. This required some basic components to build and it can be easily mounted on a pcb and a box. This project will also help you to understand the interfacing of ESP32-cam projects. You can also build and modify this project as per your needs. Try this project and don’t forget to share this article with others. Hope you like Smart Doorbell using ESP32 Camera with Custom app.


Can we do this project with an IP camera instead of ESP-32 CAM?
Hi Ede,
This project is exclusively made with ESP32 camera and if you want to use IP camera then the code has to be changed.
1)I have problem in connection once after the esp32 camera and arduino connection is done and code is been uploded to pc after that how does that code works if we remove esp32 camera from arduino and if we try connect esp32 to the bread board power supply
2) we ar facing issue with the how to connect the power supply to the bread board
3) sir you have used 2 register one is resister 330 ohms and resister 10k ohms we are not getting which register pin is connected near push button and which register is connected near led light
Hi Harshavathi. T,
Thanks for your questions!
Here Arduino is used for uploading the code and once the code is uploaded in ESP32 CAM then ESP32 will start working independently and will take complete control.
The power supply is simple and easy to connect. You need to use 5 V power supply and connect it as per circuit diagram.
As per diagram 10Kohms is used with the pushbutton switch and for current limiting 330ohms resistor is used with LED.
Hope we answered your quarries.
Sir before uploading the code under tools programmer it’s showing no “programs available for this board” it’s also it’s showing a fatal error occurred :Failed to connect to ESP32:timed out waiting for packet hearder what shall I do sir i have select this project as mini project please help me.. Sir, sir there are quite confusion in blynk app working how we will get notification and all that’s the problem if u give ur contact num that will be helpfull please help me in this mini project please sir if don’t want to publish ur number pls send it to my mail I’d sir because I have short period of time please sir
We have dropped an email please share your questions.
Is this works on the local area network i mean esp32 and device with blynk app must have been connected to the same wifi?
Your esp32 must be connected to a network which has internet. Then you can use blynk from your smartphone which has internet and access the ESP32. It is not necessary to have these devices connected within the same network. It can be connected to any network but it should have internet availability.
soloenoid lock connection to esp pin no
It has to be connected to the relay as ESP32cam cannot drive the solenoid lock.
well explained
although am getting stuck in the Arduino code step
I will update you later on if I succeed
in case some steps are missing in the sites do share by replying back
how to connect the ep32 camera in wireless mode and how to connect the internet in the camera if the door sensor doesn’t work is there any way to open the door( if network is poor condition
Hello,
If network is poor, then please make it strong or else there is no point of this IoT project as it works with internet.