Raspberry Pi Pico W with DHT11 Sensor and 16×2 LCD Display
In the ever-evolving world of technology, the Raspberry Pi Pico W has emerged as a powerful and versatile microcontroller. Combining it with sensors and display modules opens up a world of possibilities, especially in the realm of environmental monitoring. We’ll explore a simple yet effective project using the Raspberry Pi Pico W, a DHT11 sensor, and a 16×2 LCD display to create a compact environmental monitoring system. This is a DIY tutorial for enthusiasts, hobbyists, and students alike. In this tutorial, we’ll learn to interconnect a Raspberry Pi Pico W with DHT11 Sensor and 16×2 LCD Display.
Components Required
- Raspberry Pi Pico W
- DHT11 Sensor
- 16×2 LCD Display (I2C)
- Breadboard and jumper wires
- Resistor (for DHT11 sensor)
- Micro USB cable for power
Raspberry Pi Pico W: A Brief Overview
The Raspberry Pi Pico W, a variant of the popular Raspberry Pi Pico, comes equipped with wireless connectivity, making it an excellent choice for projects that require IoT capabilities. Its compact form factor, GPIO pins, and affordability make it an ideal candidate for a wide range of applications.
DHT11 Sensor: Capturing Environmental Data
The DHT11 sensor is a simple and cost-effective solution for measuring temperature and humidity. Its low power consumption and ease of use make it a popular choice for projects where environmental data is crucial. With just three pins—VCC, data, and ground—it’s a beginner-friendly sensor that delivers reliable results.
16×2 LCD Display: Visualizing Data
To make this project more user-friendly, we’ll incorporate a 16×2 LCD display. This alphanumeric display provides a clear and concise way to showcase real-time data. With its compact size and simplicity, it’s an excellent addition to projects that require a visual output.
Working
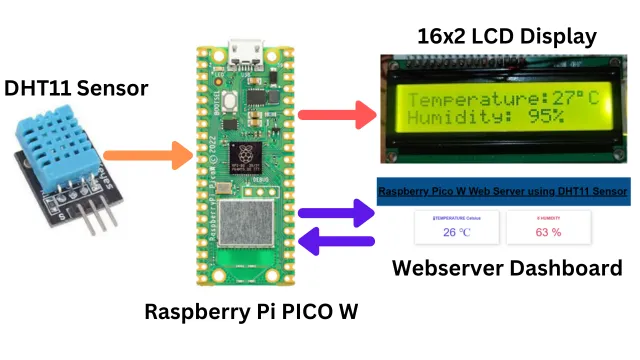
The DHT11 sensor sends the data to Raspberry Pi PICO W. Pico sends this data to LCD display and share the data using webserver at the same time.
Connection
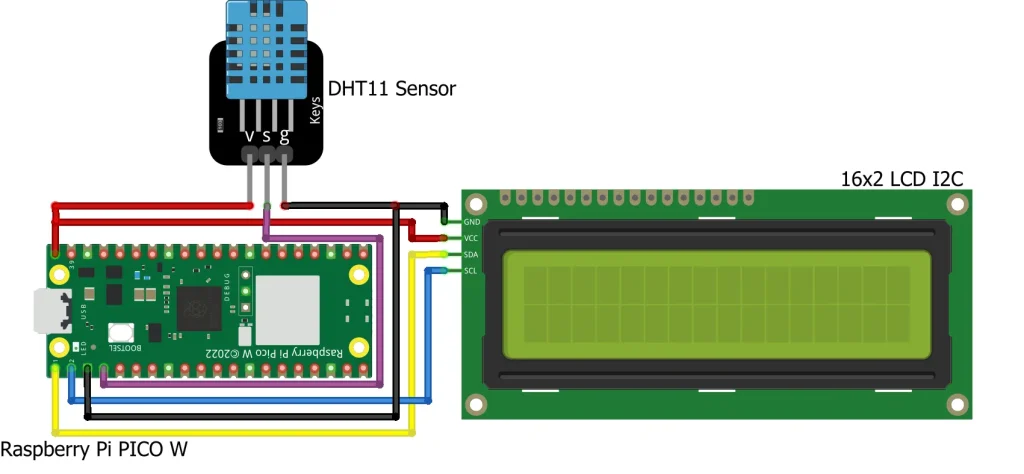
Before diving into the code, let’s set up the hardware. Connect the DHT11 sensor to the Raspberry Pi Pico W and the 16×2 LCD display. Ensure the connections are secure and follow the pinout guidelines for each component.
Raspberry Pi PICO W | DHT11 Sensor | 16x2 LCD Display |
Vcc (PIN 40) | VCC | VCC |
GND (PIN 3) | GND | GND |
SDA GPIO 0 (PIN 1) | SDA | |
SCL GPIO 1 (PIN 2) | SCL | |
GPIO 2 (PIN 4) | Data Pin |
Writing the Code
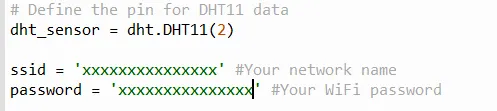
To interact with the DHT11 sensor and control the 16×2 LCD display, we’ll write a simple Python script. Utilize the “machine” and “dht” libraries to read data from the sensor, and the “lcd_i2c” library for LCD control. You can download all these python libraries along with the actual code from below link.

Uploading the Code
To upload code to your Raspberry Pi Pico W using Thonny IDE, you can follow the steps below:
- Connect your Raspberry Pi Pico W to your computer using a micro-USB data cable.
- Download the code, unzip it and open it in Thonny IDE.
- Update the Network details in the code.
- Now save all three-python file in your Raspberry Pi Pico W.
- Click on Run > Run current script or press F5 to run your code.
- Your code will be uploaded to your Raspberry Pi Pico W and executed.
If you want to learn more about using Thonny IDE with your Raspberry Pi Pico W, including how to install it and how to use its built-in features, you can check out this guide.
Building & Testing
After connecting the components in a breadboard and uploading the code, it’s time to test our project.

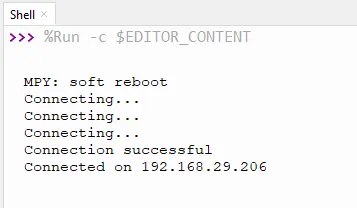
Once you run the code, the Raspberry Pi Pico W will try to connect with your local Wi-Fi network and share a webserver IP in the console.
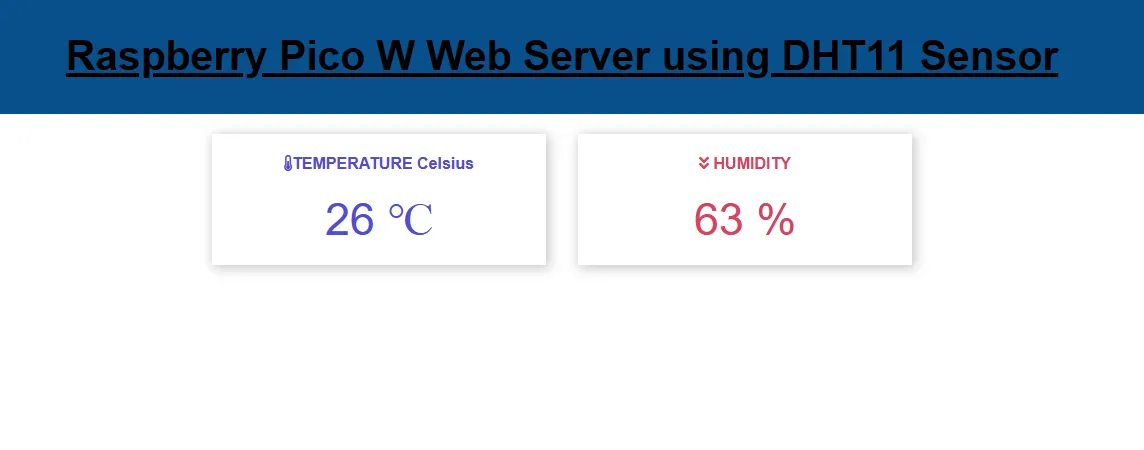
Once you open that IP in a browser you will be able to see the below dashboard. This will show you the temperature and humidity data sent by DHT11 temperature sensor.
Conclusion
This foundation can be expanded upon for more complex applications, such as data logging, cloud integration, or triggering actions based on environmental conditions. The versatility of the Raspberry Pi ecosystem ensures that the possibilities are limited only by your imagination. As you go deeper into the capabilities of the Raspberry Pi Pico W, you’ll discover endless possibilities for creating innovative and practical projects. Happy tinkering!
Related Projects:
- Connecting BMP280 sensor with Raspberry Pi Pico W
- Raspberry Pi Pico with LCD & SSD1306 OLED Display
- Custom Android app with DS18B20 sensor and Raspberry Pi PICO W
- Raspberry Pi Pico W web server with BMP180 sensor
- Configuring BMP280 Sensor with Raspberry Pi
- Weather Station with BMP280 Sensor and Raspberry Pi Pico