
Building an RFID RC522 Access System with ESP32
RFID (Radio-Frequency Identification) technology has become an integral part of access control systems, offering a secure and convenient way to manage entry to a space. In this tutorial, we will guide you through the process of building an RFID RC522 access system using the ESP32 and a simple yet effective 16×2 LCD display. The system will include a mode-switching button to register new RFID cards and allow access only to the registered cards. Radio-Frequency Identification (RFID) technology has proven to be a versatile and efficient solution. Combining an ESP32 microcontroller with an RFID RC522 module and a 16×2 LCD display opens the door to creating a robust and customizable access control system.
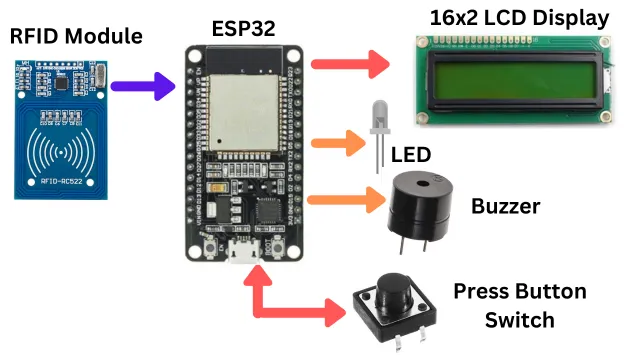
Hardware Components
- ESP32 Development Board
- RFID RC522 Module
- Push Button
- LED (for visual indication)
- Breadboard and jumper wires
ESP32 Development Board: A powerful and versatile microcontroller with built-in Wi-Fi capabilities.
RFID RC522 Module: An RFID module that communicates with RFID cards and tags.
16×2 LCD Display: An alphanumeric display for providing visual feedback and information.
Push Button: A tactile button for initiating the card registration process.
Breadboard and Jumper Wires: For creating the prototype on a breadboard.
Working
The RFID module will read the data and further it will be sent to ESP32. ESP32 will process the data and display information in LCD display. When a valid card is scanned the buzzer will beep and led will glow. When the button is pressed, the system toggles between registration mode and access mode. In registration mode, place a card near the reader to register its UID. In access mode, only cards that have been registered during the registration mode will be granted access.
Connection
Connect the components as follows (adjust pin numbers if needed)
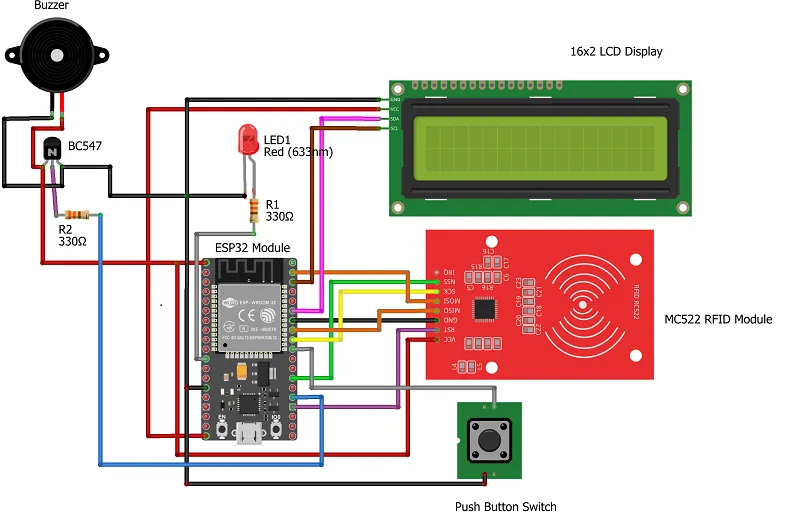
RFID RC522 module connection with ESP32
- SDA -> Pin D4
- SCK -> Pin D18
- MOSI -> Pin D23
- MISO -> Pin D19
- GND -> GND
- RST -> Pin D15
- 3.3V -> 3.3V
Connect the 16×2 LCD display to the ESP32.
- VCC to 5V
- GND to GND
- SDA to Pin D21
- SCL to Pin D22
Push button Connection to the ESP32 for card registration.
- One leg to Pin D5
- Other leg to Pin GND
Buzzer module connection for access indication
- Connect the positive terminal to Pin D2
- Connect the negative terminal to Pin GND
LED Connection
- Positive pin of LED to pin D27 for visual indication
- Ground Pin of LED to GND
Code
You can download the code from the given link below and open it using an Arduino IDE. Compile it and upload it in ESP32 development board. For further configuration you can read this guide to configure ESP32 in your Arduino IDE in case you are using it for the first time.
ESP32 programming using Arduino IDE
Required Libraries
You’ll need to install the necessary libraries for the RFID RC522 module. You can use the “MFRC522” library. You can install it via the Arduino Library Manager. Along with rfid library you have to use LCD library as well. Just type “LiquidCrystal_I2C” in library manager and install from author Frank de Brabender.

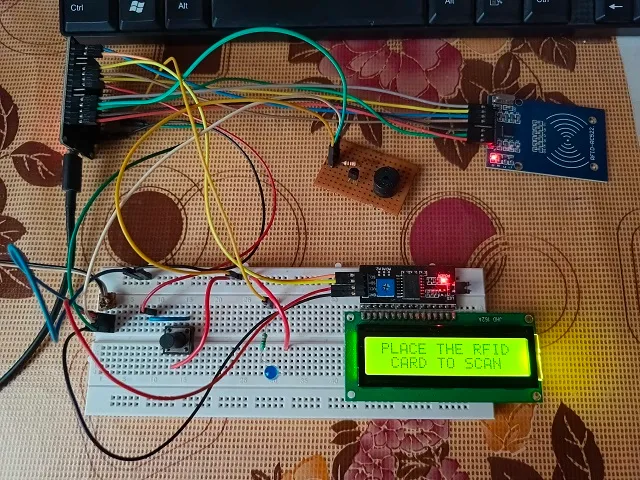
Building & Testing
Finally, all the components are connected as per the circuit diagram and got the below prototype. Once you press the push button, it will go to Registration mode. This mode will help you register any new RFID card or tag for the first time once you scan the card or tag. Then you have to press the push button to change the system to access mode.
Here it will scan every card or tag and based on registration if the card it will grant or deny the access. If your card or tag is registered, upon scanning the buzzer will beep and the led will glow for some time. you can replace the led with electronic lock as well.
Conclusion
Building an RFID RC522 access system with ESP32 and a 16×2 LCD display provides a foundation for creating secure and customized access control solutions. This project allows for further expansion, such as integrating additional sensors, implementing user authentication, or connecting to a network for centralized access management. Experiment with different features to tailor the access system to your specific requirements and enhance its functionality.
Related Projects:
- What’s a Single Board Computer and Which One Is Right for Me?
- Raspberry Pi Pico W with DHT11 Sensor and 16×2 LCD Display
- Connecting BMP280 sensor with Raspberry Pi Pico W
- Raspberry Pi Pico with LCD & SSD1306 OLED Display
- Custom Android app with DS18B20 sensor and Raspberry Pi PICO W
- Raspberry Pi Pico W web server with BMP180 sensor
- Configuring BMP280 Sensor with Raspberry Pi
- Weather Station with BMP280 Sensor and Raspberry Pi Pico

