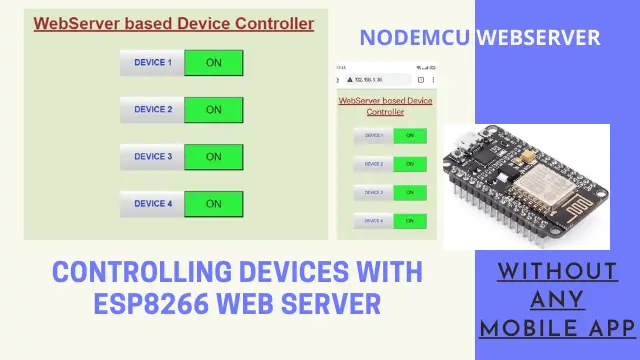
ESP8266 Web Server for Controlling Electrical Devices
In this tutorial, using the ESP8266 board, we intend to control electrical devices simultaneously with the help of relay modules, so that by setting up a web server with Internet. We can control the relays and communicate with the board. ESP8266 is one of the cheapest wifi module available in the market. Suppose you want to control several electrical devices. Well, the module that is suitable for this case is definitely the relay module, but how do you intend to control the relay module itself? In this tutorial, we are going to teach you one of the best methods for this. Be able to control your appliances from anywhere in the home or workplace. This tutorial is for beginner where they will learn ESP8266 Web Server for Controlling Electrical Devices.
Materials Required
You need only 3 thing to perform this tutorial.
ESP8266 NodeMCU Board
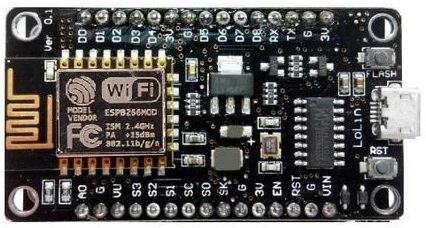
ESP8266 chips are popular in the field of IoT, which have better quality and lower price than other models. The core of this module is ESP8266 EX, which is actually located under this metal shield. Metal is placed in this module to reduce noise as well as protect sensitive SMD components. These modules are produced in different series, including esp01 and esp12.
In fact, the difference between the models is the number of GPIOs as well as their memory. Although usually the differences in appearance are usually recognizable. These modules support the internal WIFI network, these microcontrollers were first introduced in 2014. The ESP8266 has 13 GPIOs as well as an analog input (A0).
How Web Server works?
Web servers are programs that are responsible for accepting Http requests sent by users. Web servers respond by sending information that we commonly refer as HTML pages. Suppose we search https://iotstarters.com in the browser, what happens is that your browser sends a request to a domain called iotstarters.com. Normally when you search for a site address in the browser you use English letters, meaning words that are understandable to humans. But in fact to enter a site you have to go through its IP address, this is where a concept called DNS comes into play. So, in fact, when you search for a site URL, the browser finds the relevant IP through the DNS service and sends a request.
How this project Works?
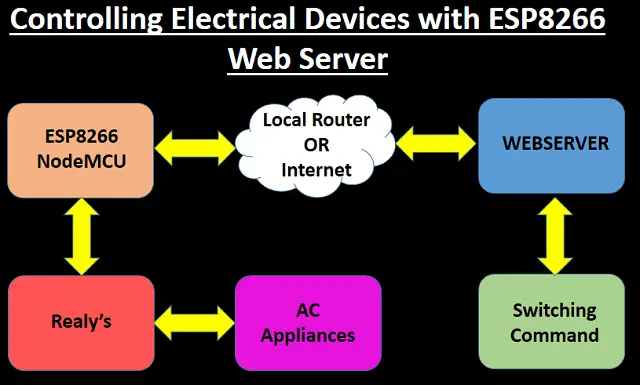
In this project, using the ESP8266 chip powered by the nodemcu board, we launched a web server with an acceptable appearance that has four keys, each of which has the ability to toggle specific pins to the ESP8266 board, but with local Internet connections. It will allow you to control your appliances wirelessly with in the same network.
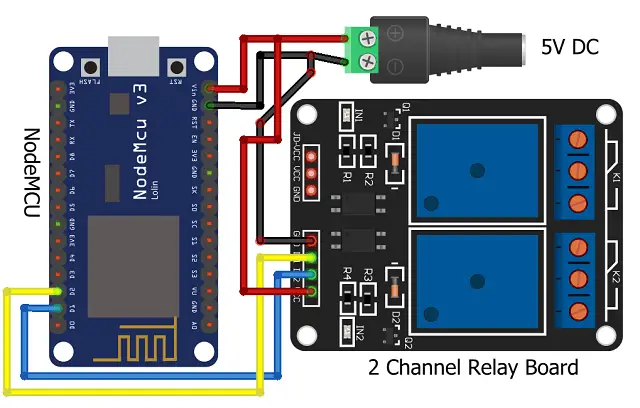
Connection Diagram
In this tutorial, we have used two relay modules. Of course, you can use a four-relay relay module that does not need to power the modules one by one and is powered by a power line of the module. Only the input pins are connected to each GPIO. Make connections to each module using the schematic below.
| NodeMCU Pin | Relay Module |
| D1 | Relay 1 |
| D2 | Relay 2 |
| D3 | Relay 3 |
| D4 | Relay 4 |
In this project, we are using pins D1, D2 to switch ON and switch OFF the relay modules. You can utilize D3, D4 as well and connect a 4 channel relay. Schematic of project connections of controlling electrical devices simultaneously with ESP8266 web server.
Code & Explanation
Now its time to understand the code of this project. NODEMCU for control of intended GPIOs. In this section we will examine the important parts of this code. In the below section, we introduce the name and password of the intended Wi-Fi network for connecting the board.
const char* ssid = "Your WIFI Name";
const char* password = "Your Wifi password";
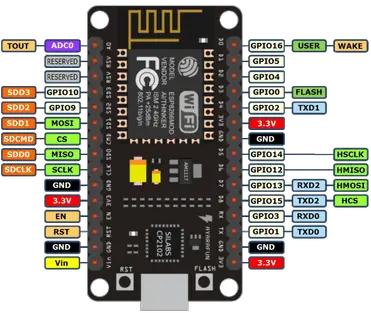
In the following, we will identify the GPIOs that you want to control, which you can change according to your needs. Note that the order of the GPIO pins is different from the name of the NODEMCU pins, so check the board PINOUTs before changing these pins.
const int relay1 = 5; // D1
const int relay2 = 4; // D2
const int relay3 = 0; // D3
const int relay4 = 2; // D4
In these three lines, we will connect to the network using SSID and WiFi password.
WiFi.begin(ssid, password);
while (WiFi.status() != WL_CONNECTED) {
delay(500);
Below code help you build a nice HTML based GUI for your webserver front end. You can change the codes before uploading to modify the GUI. Remember this is optional, change only if you are aware of CSS in HTML.
// You can customize the values according to your needs
client.println(“<style>html, body {background-color: #e0ebcd; font-family: Helvetica; display: block; color: #1336dd; margin: 0px auto; text-align: center;}”);
client.println(“.button { background-color: #30f040; color: black; padding: 12px 40px;”);
client.println(“text-decoration: none; font-size: 20px; margin: auto; cursor: pointer;}”);
client.println(“.button2 {background-color: red; color: black; padding: 12px 40px;}”);
client.println(“.textbox {width: 80px; padding: 16px 20px 0px 24px; background-image: linear-gradient(180deg, #fff, #ddd 40%, #ccc);}”);
client.println(“.mytext {font-size: 16px; font-weight:bold; font-family:Arial ; text-align: center;}”);
client.println(“.headertext{ font-weight:bold; font-family:Arial ; text-align: center; color: brown ;}”);
client.println(“#container {width: 100%; height: 100%; margin-left: 5px; margin-top: 20px; padding: 10px; display: -webkit-flex; -webkit-justify-content: center; display: flex; justify-content: center;} “);
client.println(“</style></head>”);

Final Code & Upload
You can download the complete code from the below link. You can refer to this article for uploading the code in NodeMCU.

More Projects:
- Raspberry Pi Temperature Logger DS18B20
- DHT11 Data Logger using Raspberry Pi and Python code
- DS18B20 with NodeMCU Local WebServer
- Telegram NodeMCU based Home Automation
- IoT based water level Indicator using ESP8266
- ESP32 / NodeMCU based Web Server with Physical Switch Feedback
- Touch Based Switch board using TTP223
- NodeMCU ESP8266 IoT based LPG Gas Leakage Alarm
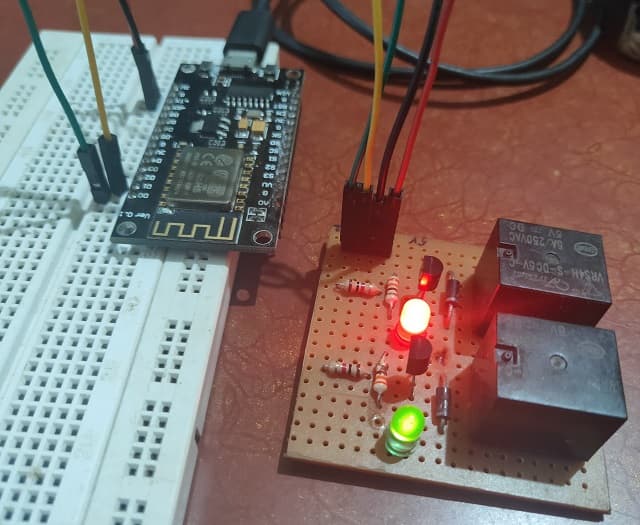
Construction & Testing
Once you have connected the components as per connection diagram and uploaded the code, now its time for testing.
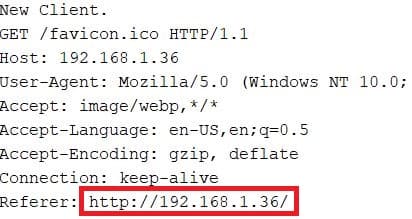
Obtaining IP address
After uploading the code in NodeMCU. Now open the Arduino Serial monitor and press the reset button in nodemcu. Now you will get the Ip address allocated to your nodemcu on your local network. It will show something like shown below
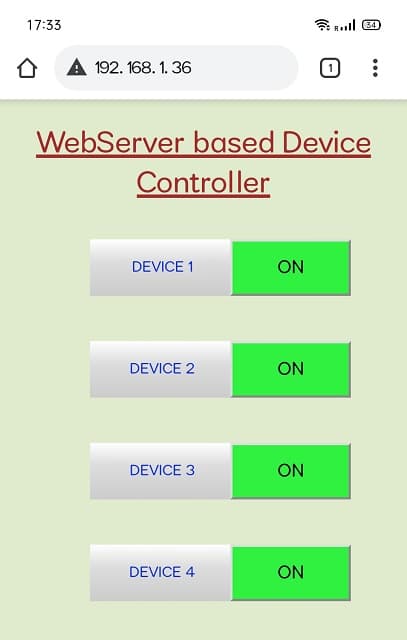
Now open a browser and enter this IP address. Once you hit enter you will be able to see the webpage of your webserver
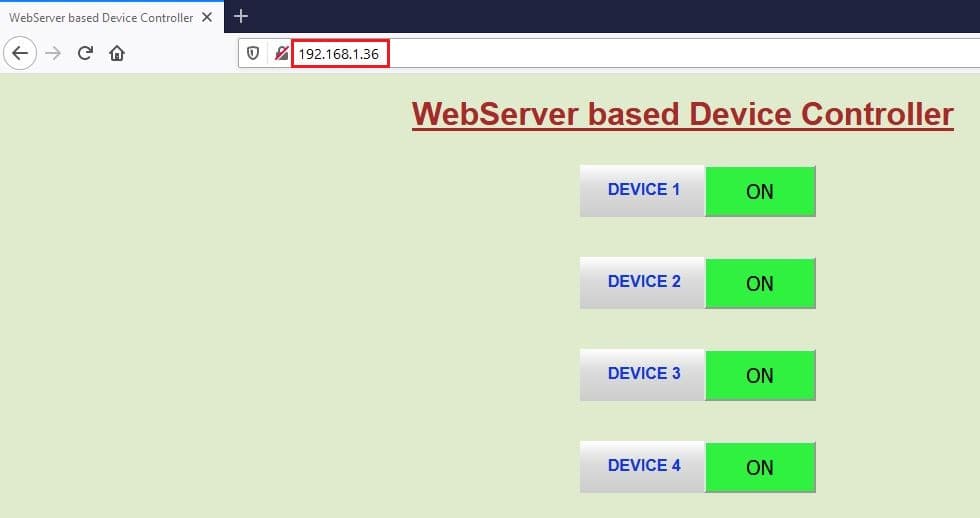
You can access the same from your mobile browser as well.
Conclusion
In this project, we set up and controlled four relay modules by a web server with the help of NODEMCU WiFi board with ESP8266 chip. You can change the code and add the number of relays in the web page code and control functions and control more appliance. After implementing this project, you will be able to use the facilities of this launched web server by connecting to the local Internet. We can also use the web server independently and without the need for the Internet by changing the access point mode to SoftAP.

