
ESP32 / NodeMCU based Web Server with Physical Switch Feedback
In this tutorial we will learn how to use ESP32 or ESP8266 as a web server and also connect the same devices using physical switches simultaneously. The change in status of the device is updated on the web page. This change can be from physical switch or it can be from the web server. ESP32/NodeMCU based Web Server with Physical Switch Feedback is a simple project to build. The code is for advance learners.
ESP32 / ESP8266 NodeMCU boards should be added in your Arduino IDE as we will be using Arduino IDE to program and upload the codes. In case it is not configured then check below link for configuration.
How it works?
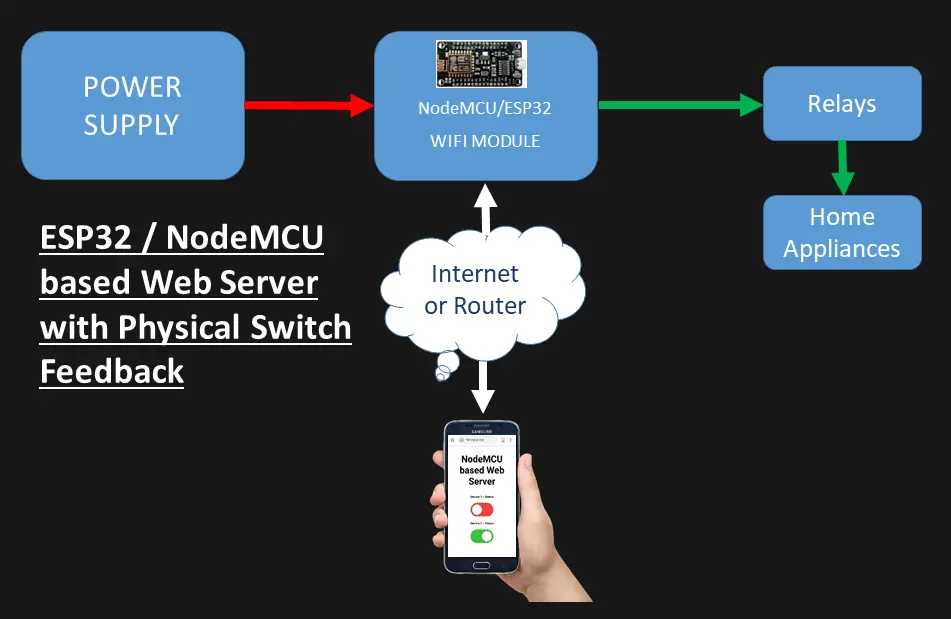
The ESP32 or ESP8266 NodeMCU is used for hosting web server which will allow you to control GPIO pins based on configurations done in the code. The change in status and existing status will be displayed in the web server.
We have also connected physical switches with the ESP32 or ESP8266 NodeMCU which will control the same GPIO pins. If the changes are made using physical switches, still it will update on the web page of the web server.
Parts List
- ESP32 / ESP8266 NodeMCU board x 1
- 2 Channel Relay Module x 1
- Push Button Switches x 2
- Resistor 10KΩ x 2
- Bread Board
- Mobile Charger (5V/1A) as Power Supply
- Jumper wires
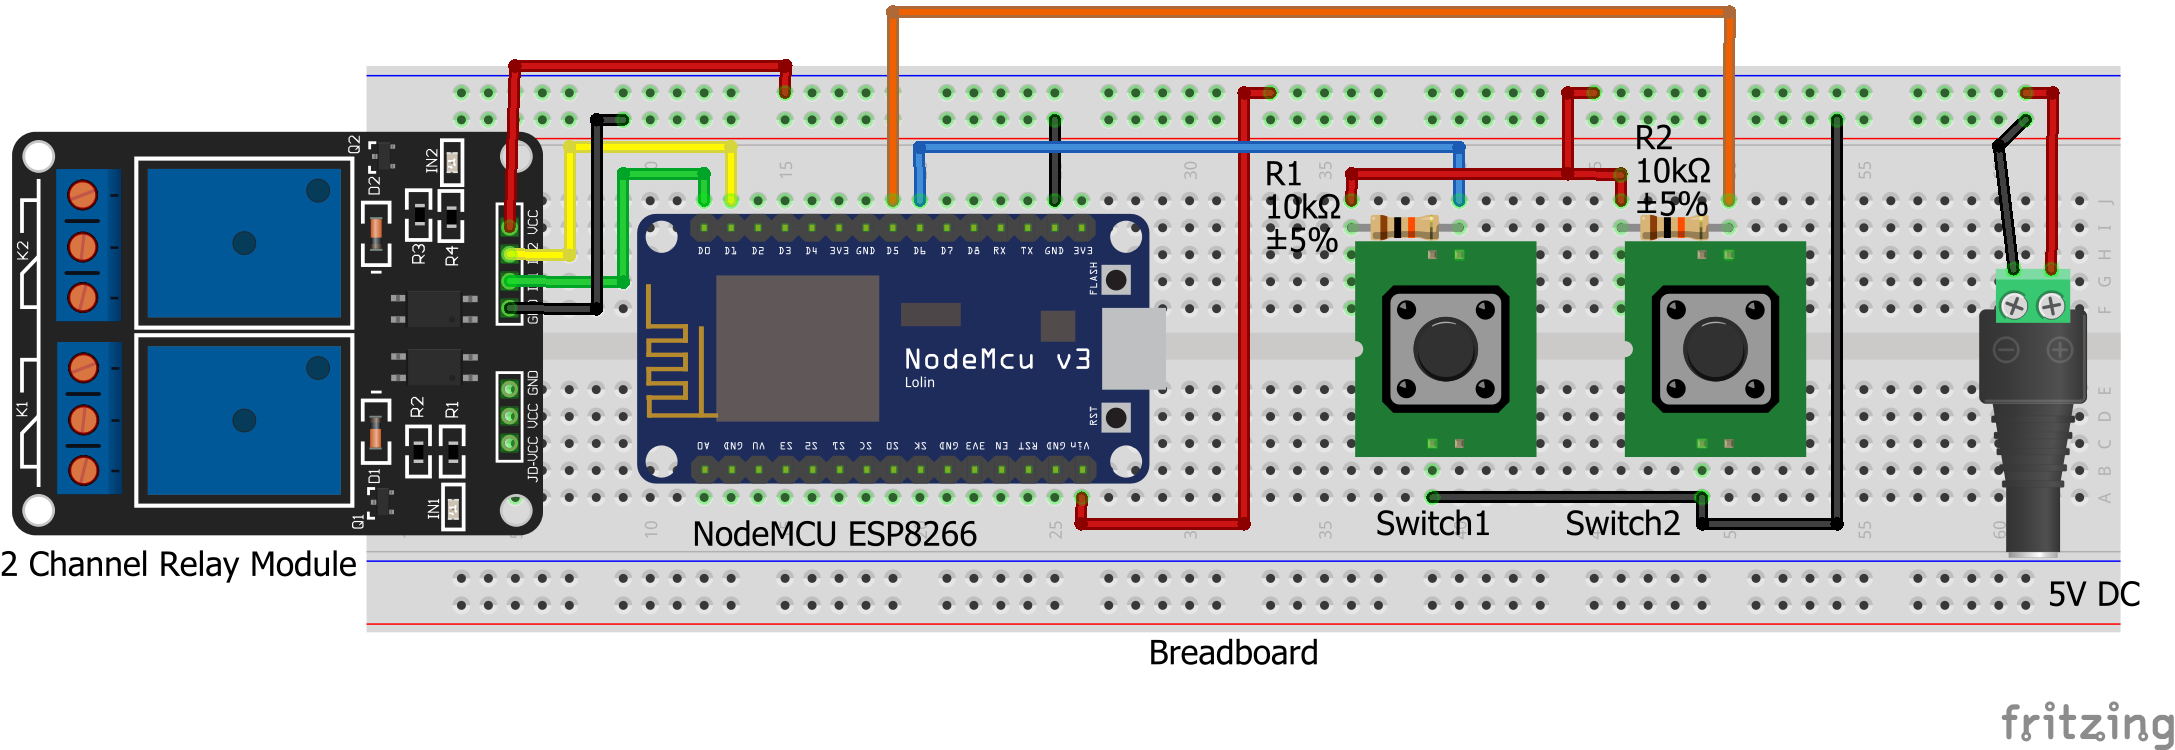
Connection Diagram
Required Library
Async Web Server
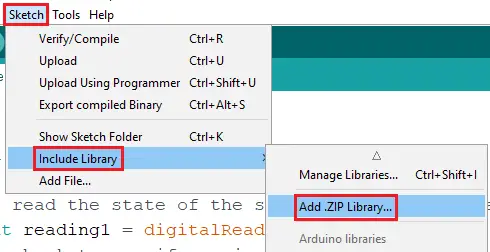
If you are looking in to Arduino Library Manager, then you might not get it there. You have to download the zip files from respective locations and you can go to Sketch –> Include Library -> Add .zip Library in Arduino IDE to import them.
Below libraries are required for this project
If you are using ESP32:
Then install ESPAsyncWebServer and AsyncTCP libraries.
If you are using ESP8266/NodeMCU
Then install ESPAsyncWebServer and ESPAsyncTCP libraries.
Coding
#ifdef ESP32 // ESP32 libraries
#include <WiFi.h>
#include <AsyncTCP.h>
#else // ESP8266 libraries
#include <ESP8266WiFi.h>
#include <ESPAsyncTCP.h>
#endif
#include <ESPAsyncWebServer.h>

//******Enter your network credentials************
const char* ssid = "Your Network SSID";
const char* password = "Your network Password";
//************************************************

//Define Status
const char* PARAM_INPUT_1 = "state";
const char* PARAM_INPUT_2 = "state2";

//**********Pin Assignments***********
const int relay1 = 16; // D0 Pin of NodeMcu, change it if you are using ESP32
const int switch1 = 12; // D6 Pin of NodeMcu, change it if you are using ESP32
const int relay2 = 5; // D1 Pin of NodeMcu, change it if you are using ESP32
const int switch2 = 14; // D5 Pin of NodeMcu, change it if you are using ESP32
//************************************

//*********************Variables declaration**********************
int relay_1_status = LOW; // the current status of relay1
int switch_1_status; // the current status of switch1
int last_switch_1_status = LOW; // Last status of switch1
int relay_2_status = LOW; // the current status of relay2
int switch_2_status; // the current status of switch2
int last_switch_2_status = LOW; // Last status of switch2
//****************************************************************

// the following variables are unsigned longs because the time, measured in
// milliseconds, will quickly become a bigger number than can be stored in an int.
unsigned long lastDebounceTime = 0; // the last time the output pin was toggled
unsigned long debounceDelay = 50; // the debounce time; increase if the output flickers

// Create AsyncWebServer object on port 80
AsyncWebServer server(80);

const char index_html[] PROGMEM = R"rawliteral(
<!DOCTYPE HTML><html>
<head>
<title>NodeMCU based Web Server</title>
<meta name="viewport" content="width=device-width, initial-scale=1">
<style>
html {font-family: Arial; display: inline-block; text-align: center;}
h2 {font-size: 3.0rem;}
p {font-size: 3.0rem;}
body {max-width: 600px; margin:0px auto; padding-bottom: 25px;}
.switch {position: relative; display: inline-block; width: 120px; height: 68px}
.switch input {display: none}
.slider {position: absolute; top: 0; left: 0; right: 0; bottom: 0; background-color: #F63E36; border-radius: 34px}
.slider:before {position: absolute; content: ""; height: 52px; width: 52px; left: 8px; bottom: 8px; background-color: #fff; -webkit-transition: .4s; transition: .4s; border-radius: 68px}
input:checked+.slider {background-color: #3CC33C}
input:checked+.slider:before {-webkit-transform: translateX(52px); -ms-transform: translateX(52px); transform: translateX(52px)}
</style>
</head>
<body>
<h2>NodeMCU based Web Server</h2>
%BUTTONPLACEHOLDER%
%BUTTONPLACEHOLDER2%
<script>
function toggleCheckbox(element)
{
var xhr = new XMLHttpRequest();
if(element.checked)
{
xhr.open("GET", "/update?state=1", true);
}
else
{
xhr.open("GET", "/update?state=0", true);
}
xhr.send();
}

function toggleCheckbox2(element)
{
var xhr2 = new XMLHttpRequest();
if(element.checked)
{
xhr2.open("GET", "/update?state2=1", true);
}
else
{
xhr2.open("GET", "/update?state2=0", true);
}
xhr2.send();
}

setInterval(function ( )
{
var xhttp = new XMLHttpRequest();
xhttp.onreadystatechange = function()
{
if (this.readyState == 4 && this.status == 200)
{
var inputChecked;
var outputStateM;

if( this.responseText == 1)
{
inputChecked = true;
outputStateM = "ON";
}
else
{
inputChecked = false;
outputStateM = "OFF";
}
document.getElementById("output").checked = inputChecked;
document.getElementById("outputState").innerHTML = outputStateM;
}
}
xhttp.open("GET", "/state", true);
xhttp.send();

var xhttp2 = new XMLHttpRequest();
xhttp2.onreadystatechange = function()
{
if (this.readyState == 4 && this.status == 200)
{
var inputChecked2;
var outputStateM2;

if( this.responseText == 1)
{
inputChecked2 = true;
outputStateM2 = "ON";
}
else
{
inputChecked2 = false;
outputStateM2 = "OFF";
}
document.getElementById("output2").checked = inputChecked2;
document.getElementById("outputState2").innerHTML = outputStateM2;
}
};
xhttp2.open("GET", "/state2", true);
xhttp2.send();

}, 1000 ) ;
</script>
</body>
</html>
)rawliteral";

// Replaces placeholder with button section in your web page
String processor(const String& var)
{
//Serial.println(var);
if(var == "BUTTONPLACEHOLDER")
{
String buttons1 ="";
String outputStateValue = outputState();
buttons1+= "<h4>Device 1 - Status <span id=\"outputState\"><span></h4><label class=\"switch\"><input type=\"checkbox\" onchange=\"toggleCheckbox(this)\" id=\"output\" " + outputStateValue + "><span class=\"slider\"></span></label>";
return buttons1;
}

if(var == "BUTTONPLACEHOLDER2")
{
String buttons2 ="";
String outputStateValue2 = outputState2();
buttons2+= "<h4>Device 2 - Status <span id=\"outputState2\"><span></h4><label class=\"switch\"><input type=\"checkbox\" onchange=\"toggleCheckbox2(this)\" id=\"output2\" " + outputStateValue2 + "><span class=\"slider\"></span></label>";
return buttons2;
}
return String();
}

String outputState()
{
if(digitalRead(relay1))
{
return "checked";
}
else
{
return "";
}
return "";
}
String outputState2()
{
if(digitalRead(relay2))
{
return "checked";
}
else
{
return "";
}
return "";
}

void setup()
{
// Serial port for debugging purposes
Serial.begin(115200);

pinMode(relay1, OUTPUT);
digitalWrite(relay1, LOW);
pinMode(switch1, INPUT);

pinMode(relay2, OUTPUT);
digitalWrite(relay2, LOW);
pinMode(switch2, INPUT);

// Connect to Wi-Fi
WiFi.begin(ssid, password);
while (WiFi.status() != WL_CONNECTED)
{
delay(1000);
Serial.println("Connecting to WiFi..");
}

// Print ESP Local IP Address
Serial.println(WiFi.localIP());

// Route for root / web page
server.on("/", HTTP_GET, [](AsyncWebServerRequest *request)
{
request->send_P(200, "text/html", index_html, processor);
});

// Send a GET request
server.on("/update", HTTP_GET, [] (AsyncWebServerRequest *request)
{
String inputMessage;
String inputParam;

// GET input1 value on <ESP_IP>/update?state=<inputMessage>
if (request->hasParam(PARAM_INPUT_1))
{
inputMessage = request->getParam(PARAM_INPUT_1)->value();
inputParam = PARAM_INPUT_1;
digitalWrite(relay1, inputMessage.toInt());
relay_1_status = !relay_1_status;
}
else
{
inputMessage = "No message sent";
inputParam = "none";
}
Serial.println(inputMessage);
request->send(200, "text/plain", "OK");

String inputMessage2;
String inputParam2;

if (request->hasParam(PARAM_INPUT_2))
{
inputMessage2 = request->getParam(PARAM_INPUT_2)->value();
inputParam2 = PARAM_INPUT_2;
digitalWrite(relay2, inputMessage2.toInt());
relay_2_status = !relay_2_status;
}
else
{
inputMessage2 = "No message sent";
inputParam2 = "none";
}
Serial.println(inputMessage2);
request->send(200, "text/plain", "OK");
});

// Send a GET request to <ESP_IP>/state
server.on("/state", HTTP_GET, [] (AsyncWebServerRequest *request)
{
request->send(200, "text/plain", String(digitalRead(relay1)).c_str());
});

server.on("/state2", HTTP_GET, [] (AsyncWebServerRequest *request)
{
request->send(200, "text/plain", String(digitalRead(relay2)).c_str());
});
// Start server
server.begin();
}

void loop()
{
int reading1 = digitalRead(switch1);
if (reading1 != last_switch_1_status)
{
lastDebounceTime = millis(); // reset the debouncing timer
}

if ((millis() - lastDebounceTime) > debounceDelay)
{
if (reading1 != switch_1_status)
{
switch_1_status = reading1;
if (switch_1_status == HIGH)
{
relay_1_status = !relay_1_status;
}
}
}

int reading2 = digitalRead(switch2);
if (reading2 != last_switch_2_status)
{
lastDebounceTime = millis();
}

if ((millis() - lastDebounceTime) > debounceDelay)
{
if (reading2 != switch_2_status)
{
switch_2_status = reading2;
if (switch_2_status == HIGH)
{
relay_2_status = !relay_2_status;
}
}
}
// set the LED:
digitalWrite(relay1, relay_1_status);
digitalWrite(relay2, relay_2_status);

// save the reading. Next time through the loop, it'll be the lastButtonState:
last_switch_1_status = reading1;
last_switch_2_status = reading2;
}
How the Code Works?
Here we will let you know about the important parts of the code.
Network Credentials
You have to update the network related details. This will help to connect ESP boards to internet router and get a local IP.
//******Enter your network credentials************
const char* ssid = "Your Network SSID";
const char* password = "Your network Password";
//************************************************
Declaring variables for Switch and Output status
The “relay_1_status” variable holds the relay1 status. When web server is initiated the value remains at LOW.
int relay_1_status = LOW; // the current status of relay1
The “switch_1_status” is used to detect the current status of the switch1. Similarly “last_switch_1_status” is used to detect the last status of the switch.
int switch_1_status;  // the current status of switch1
int last_switch_1_status = LOW;  // Last status of switch1
Here we are not using the standard HTML code to create the buttons on the webpage. Instead we are creating placeholder for the buttons on the web server %BUTTONPLACEHOLDER%. This will replace the HTML code to create buttons. Since we are using physical switches which will also make the changes on the button depending upon the status of the relays.
<h2>NodeMCU based Web Server</h2>
%BUTTONPLACEHOLDER%
GET Request for changing relay status
When switch is pressed, the toggleCheckbox() function is called. This is a java script function, that will make the request on different URLs to turn the relay on or off.
function toggleCheckbox(element)
{
var xhr = new XMLHttpRequest();
if(element.checked)
{
xhr.open("GET", "/update?state=1", true);
}
else
{
xhr.open("GET", "/update?state=0", true);
}
xhr.send();
}
For switching on the relay, the code makes a request on the /update?state=1 URL
if(element.checked)
{
xhr.open("GET", "/update?state=1", true);
}
Else the code makes a request on the /update?state=0 URL.
else
{
xhr.open("GET", "/update?state=0", true);
}
GET Request to Update Status
Once the relay state is changed, it needs to be updated on the web server. Hence we are calling setInterval java script function to make a new request on the /state URL every second.
setInterval(function ( )
{
var xhttp = new XMLHttpRequest();
xhttp.onreadystatechange = function()
{
if (this.readyState == 4 && this.status == 200)
{
var inputChecked;
var outputStateM;

if( this.responseText == 1)
{
inputChecked = true;
outputStateM = "ON";
}
else
{
inputChecked = false;
outputStateM = "OFF";
}
document.getElementById("output").checked = inputChecked;
document.getElementById("outputState").innerHTML = outputStateM;
}
}

xhttp.open("GET", "/state", true);
xhttp.send();

}, 1000 ) ;
First, this “button_control()” function checks if HTML texts contains any placeholders %BUTTONPLACEHOLDER% and replaces any placeholders with actual values.
if(var == "BUTTONPLACEHOLDER")
Then, it is calling another function outputState(). This returns the current relay status and it is saved in outputStateValue variable.
String outputStateValue = outputState();
After saving the values in outputStateValue variable we are putting it in the HTML text to display the switch with right status.
buttons1+= "<h4>Device 1 - Status <span id=\"outputState\"><span></h4><label class=\"switch\"><input type=\"checkbox\" onchange=\"toggleCheckbox(this)\" id=\"output\" " + outputStateValue + "><span class=\"slider\"></span></label>";
Handling Requests
Now we need to handle, when the ESP32 or ESP8266 NodeMCU receives requests on URLs. When a request hits on the root / URL, it is sent to HTML page and to button_control function.
server.on("/", HTTP_GET, [](AsyncWebServerRequest *request)
{
request->send_P(200, "text/html", index_html, button_control);
});
Below code checks, If you have received any request on the /update?state=1 or /update?state=0 URL. Then it changes the relay_1_status respectively.
server.on("/update", HTTP_GET, [] (AsyncWebServerRequest *request)
{
String inputMessage;
String inputParam;

if (request->hasParam(PARAM_INPUT_1))
{
inputMessage = request->getParam(PARAM_INPUT_1)->value();
inputParam = PARAM_INPUT_1;
digitalWrite(relay1, inputMessage.toInt());
relay_1_status = !relay_1_status;
}
else
{
inputMessage = "No message sent";
inputParam = "none";
}
Serial.println(inputMessage);
request->send(200, "text/plain", "OK");
If a request is received on the /state URL, then the status is sent to the current realy status.
server.on("/state", HTTP_GET, [] (AsyncWebServerRequest *request)
{
request->send(200, "text/plain", String(digitalRead(relay1)).c_str());
});
Inside void loop() function
Inside void loop() fuction, When there is toggle in the switch to turn on / off the relay it changes the status of relay_1_status variable based on the value.
digitalWrite(relay1, relay_1_status);
Testing
Since our code is ready lets upload the code in ESP32 or ESP8266 NodeMCU board. Once the code is uploaded, we need to identify the local IP address of our ESP board.
To check the IP address open the Serial Monitor in Arduino IDE. Baud rate should be set to 9600 and then press the EN or RST button on your ESP board and the IP will be displayed in Serial Monitor console.
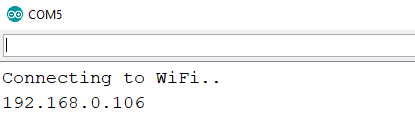
Once you get this IP Address, open your browser on your smart phone or laptop. Put this IP in your URL box and access it. you will get the below webpage.
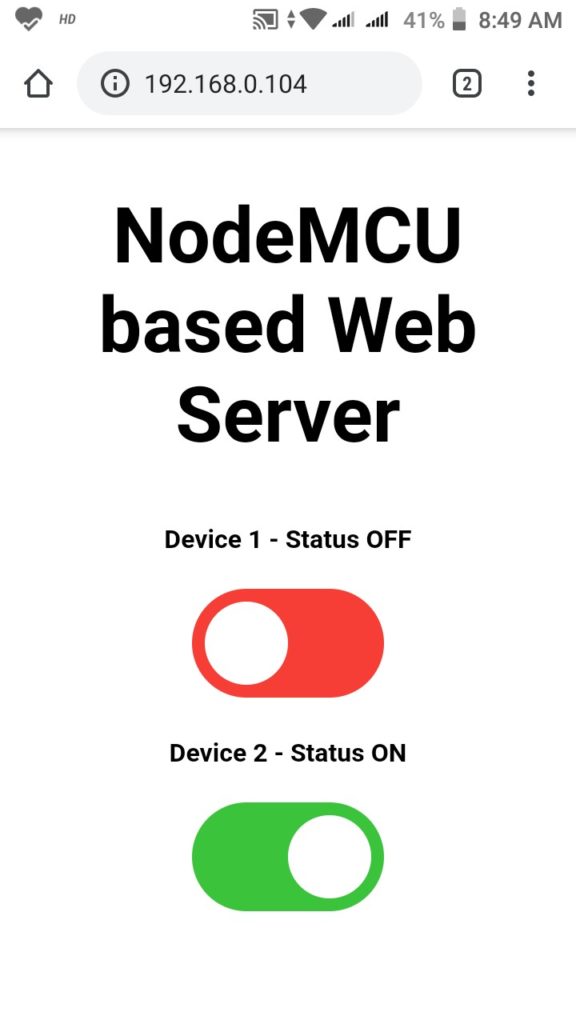
Conclusion
With this project you to control single or multiple GPIO’s using web server as well as physical switch. When ever the GPIO’s are controlled using physical switch it also updates the data in web server immediately. This is also easy to build, no complex components needed. If you have a router then you can use this project with out internet.


Please note that the functions outputState() and outputState2() are declared AFTER they are first used in code. Depending on the IDE used and its settings, this can/will cause this example to be unable to complile—gives warnings/errors that the functions are not within scope. This is especially true if using the VSCode/PlatformIO extensions. Arduino IDE tends to overlook this by default…
Very well explained. If analog read can add in this example it will be complete.
Another think I did not find any example related to virtual pin control on internet it will be different thing as compare to other example on internet.
Instead of control physically button I am trying to control over serial (RS485). Like Web button will change the state of relay and this relay state will send command over RS485 to relay module. This way we can control whole house switches in one location.
I try to add some more button in your example but response time of server is increased. Can we make it in array of buttons that can help to reduce the response time.
Hello, this is an very great Projekt. Gives a Chance to make one Button as an momentary switch? I mean that when i push the Button on Web or the manual button that the Relais switched on and automaticly off after 1sec? I need this Function to Start my Garage Door. Please help me that i can make my spezial Project works:-)
Is it possible to put a button with a real pushbutton function? I mean,
send a high level if button is held down and a low level if button is released…
Yes it can be done, you might have to reverse the logic.
suddenly web server stopped responding in other wifi router networks, and also if you are answering my question so the problem is also for OTA that it is not accessible other than the router with which the ESP is connected, thanks a lot