Raspberry Pi with MQTT Broker and Displaying Sensor Data on Node-RED Dashboard
In this tutorial, we will set up a Raspberry Pi as an MQTT broker, collect sensor data using an ESP8266 with a DHT11 sensor, and display the data on a Node-RED dashboard. MQTT (Message Queuing Telemetry Transport) is a lightweight messaging protocol ideal for IoT applications due to its low power usage and minimal bandwidth consumption. Hope you like this tutorial on Raspberry Pi with MQTT Broker and Displaying Sensor Data on Node-RED.
Components Required
- Raspberry Pi (any model with Wi-Fi connection)
- ESP8266 (NodeMCU)
- DHT11 temperature and humidity sensor
- Jumper wires
- Breadboard (optional)
Working
Below is the working of this project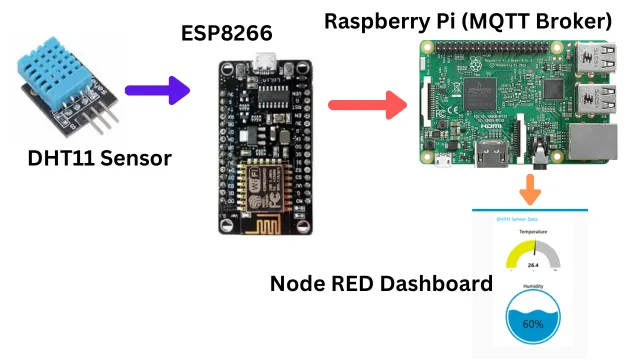
Setting Up ESP8266 with DHT11 Sensor
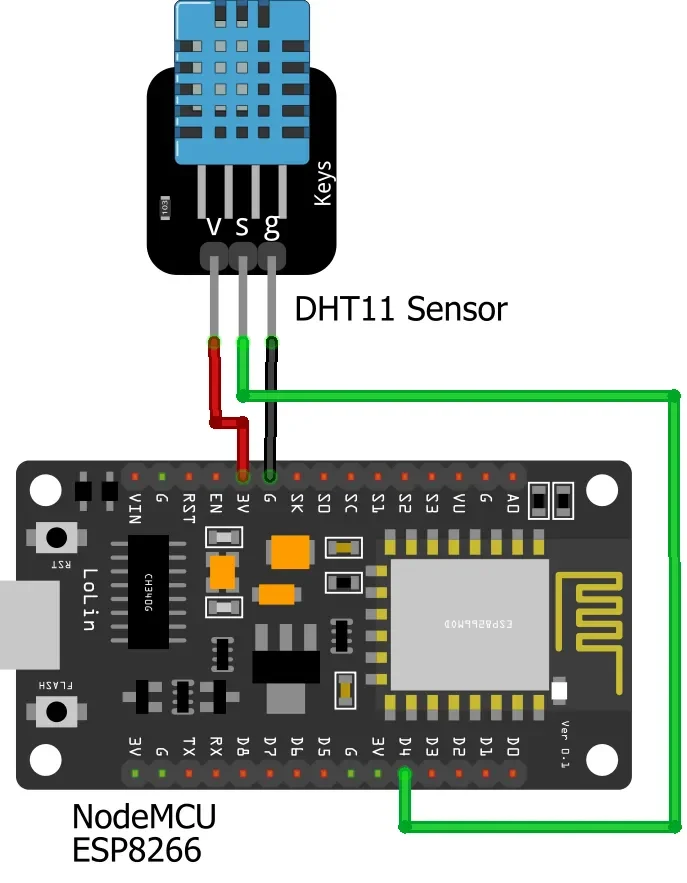
Wiring the DHT11 to ESP8266
- Connect the VCC pin of DHT11 to the 3.3V pin of ESP8266.
- Connect the GND pin of DHT11 to the GND pin of ESP8266.
- Connect the DATA pin of DHT11 to a digital pin (e.g., D4) of ESP8266.
Configuring Arduino IDE
First download the Arduino IDE from the official website. After installing follow the below steps.
Install ESP8266 Board in Arduino IDE: Open Arduino IDE, go to File > Preferences and add the following URL to the Additional Boards Manager URLs field:
Then go to Tools > Board > Boards Manager, search for esp8266, and install it.
Install Required Libraries: Go to Sketch > Include Library > Manage Libraries, search for and install the following libraries:
-
- DHT sensor library by Adafruit
- PubSubClient by Nick O’Leary
Code
You can download the code from the given link and upload it in your nodeMCU. We have an illustrated tutorial that can help you in doing this.
Upload the code to the ESP8266. Make sure to select the correct board and port from the Tools menu.
Setting Up Raspberry Pi as MQTT Broker
Install Raspberry Pi OS
- Download Raspberry Pi OS from the official Raspberry Pi website.
- Use Raspberry Pi Imager or balenaEtcher to flash the OS image to your microSD card.
- Once the OS is flashed, enable SSH and configure Wi-Fi by creating `ssh` and `wpa_supplicant.conf` files in the boot partition of the SD card.
Boot and Update Raspberry Pi
- Insert the microSD card into the Raspberry Pi and power it on.
- Use an SSH client (like PuTTY) to connect to the Raspberry Pi.
- Login to Raspberry Pi and update the system by executing the below commands one after another.
sudo apt-get update
sudo apt-get upgrade
Installing MQTT
To install MQTT (Mosquitto), run the below command.
sudo apt install mosquitto mosquitto-clients
After installing MQTT Enable and start the MQTT service from below commands
sudo systemctl enable mosquitto
sudo systemctl start mosquitto
Go to sudo nano /etc/mosquitto/mosquitto.conf
Enter below lines, Save and exit.
listener 1883
allow_anonymous true
Installing Node-RED on Raspberry Pi
To install and run node-red on your raspberry pi, Use the below commands
sudo apt-get install -y nodejs npm
sudo npm install -g –unsafe-perm node-red
sudo systemctl enable nodered.service
sudo systemctl start nodered.service
Configuring Node-RED Dashboard
Installing Dashboard Nodes
In the Node-RED interface, go to the menu, select Manage palette, then click on Install and search for node-red-dashboard and Install it.
Creating a Flow
Access Node-RED:
-
- Open a web browser and go to
http://<your_raspberry_pi_ip>:1880.
- Open a web browser and go to
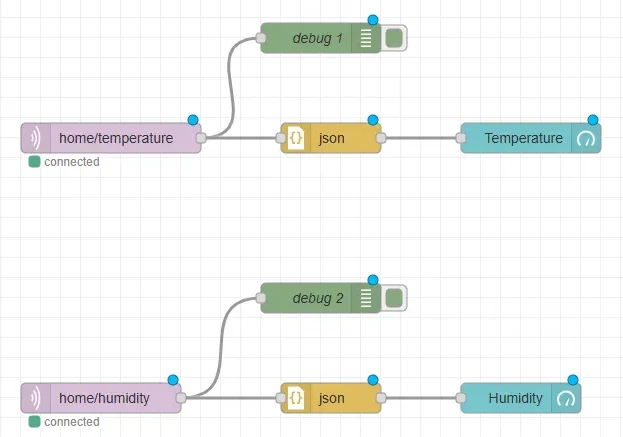
Create a Flow in Node-RED:
-
- Drag and drop an MQTT input node, a JSON node, and a debug node onto the workspace.
- Configure the MQTT input node for Temperature:
- Server:
mqtt://localhost:1883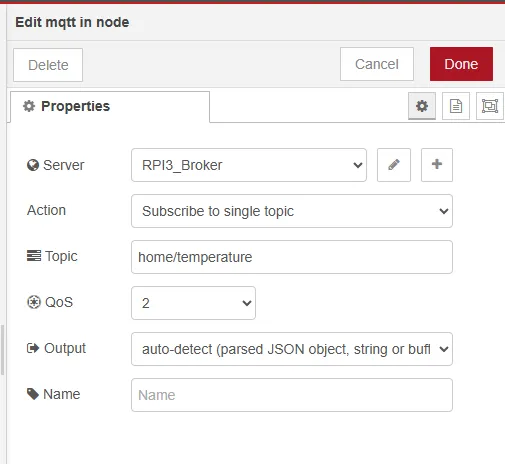
- Topic:
home/temperature(similarly forhome/humidity)
- Server:
- Connect the nodes: MQTT input -> JSON -> Debug.
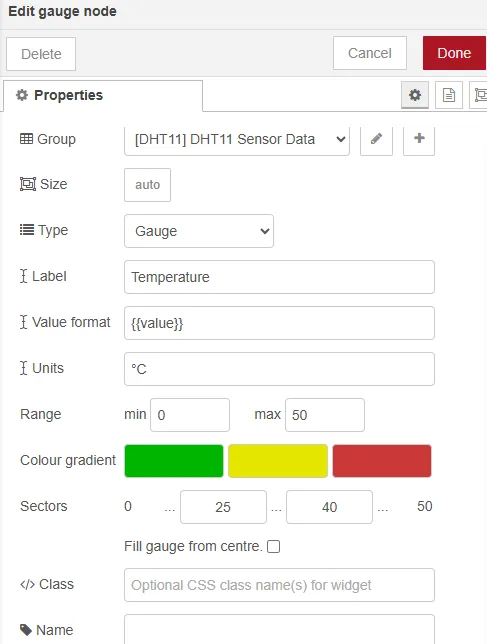
- Add a gauge and connect it with JSON, configure it as shown below
 Deploy the Flow:
-
- Click the Deploy button to save and run the flow.
- Open the debug panel to see the incoming messages.
Building and Testing
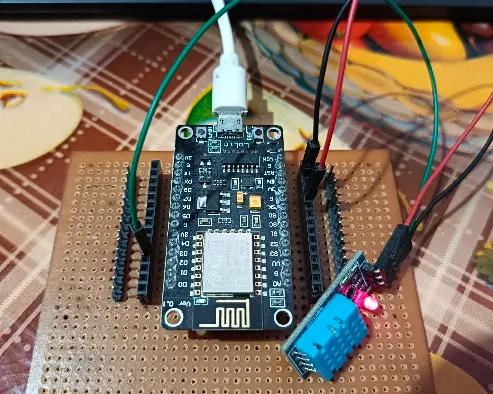
- Power up the NodeMCU and Raspberry Pi.
- Monitor the Serial Output: Open the Serial Monitor in Arduino IDE to see the debug messages from NodeMCU.
- Check Node-RED: Go to the Node-RED interface and observe the temperature and humidity data in the debug panel.
Viewing Data on Node-RED Dashboard
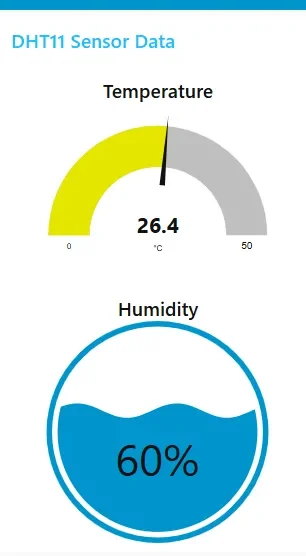
- Access the Node-RED dashboard: Open your web browser and navigate to <http://RaspberryPi_IP>:1880/ui>
- Monitor the data: You should see the real-time temperature and humidity data displayed on the dashboard.
Conclusion
In this tutorial, we successfully set up Raspberry Pi with MQTT Broker and Displaying Sensor Data on Node-RED, connected an ESP8266 with a DHT11 sensor to publish data, and displayed the sensor data on a Node-RED dashboard. This setup is highly scalable and can be extended to include multiple sensors and devices, making it a powerful solution for IoT projects.
Related Projects:
- ESP32 based MAX30100 Pulse Oximeter Webserver
- Connecting DS18B20 Sensor with Node-RED using Raspberry Pi
- Building an RFID RC522 Access System with ESP32
- What’s a Single Board Computer and Which One Is Right for Me?
- Raspberry Pi Pico W with DHT11 Sensor and 16×2 LCD Display
- Connecting BMP280 sensor with Raspberry Pi Pico W
- Raspberry Pi Pico with LCD & SSD1306 OLED Display
- Custom Android app with DS18B20 sensor and Raspberry Pi PICO W
- Raspberry Pi Pico W web server with BMP180 sensor
- Configuring BMP280 Sensor with Raspberry Pi
- Weather Station with BMP280 Sensor and Raspberry Pi Pico

Why, oh why do you use such a crappy sensor for this project? The BME280 or AHT10 sensors are infinitely better and more accurate. for temperature the trusty Maxim DS18B20 is unbeatable.
Agree, since it’s available easily so we did. Many iot enthusiast as beginners can start.
We will get the same setup using BME280 and DS18B20 as well.