Building a Low-Cost MQTT Broker Using Raspberry Pi Zero W
In the world of IoT (Internet of Things), devices need a lightweight and efficient way to communicate with each other. MQTT (Message Queuing Telemetry Transport) is a popular protocol for such communications, especially when resources are limited. It’s fast, reliable, and designed specifically for devices with low processing power and limited network bandwidth. In this blog post, we’ll walk you through the entire process of Building a Low-Cost MQTT Broker Using Raspberry Pi Zero W.
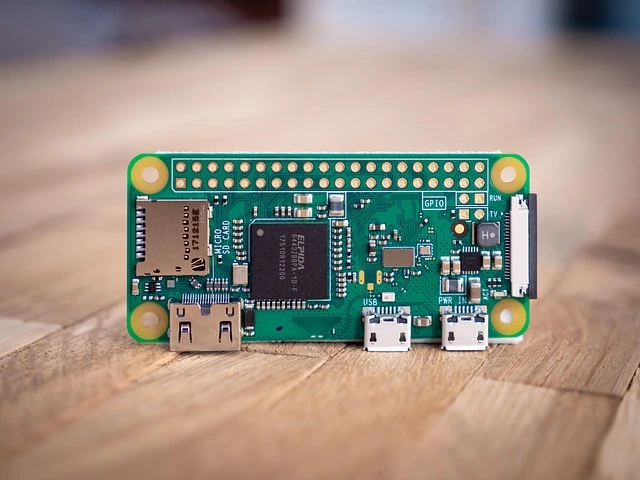
If you’re just starting with home automation or IoT projects, setting up your own MQTT broker can feel intimidating. But what if you could build one using a low cost computer? That’s where the Raspberry Pi Zero W comes in—a tiny, affordable board with built-in Wi-Fi.
This guide is designed for beginners and assumes no prior experience with MQTT or Raspberry Pi. By the end, you’ll have your own functional, low-cost MQTT broker ready to power your smart devices.
What is MQTT?
MQTT stands for Message Queuing Telemetry Transport. It’s a publish/subscribe messaging protocol designed for lightweight communication, making it ideal for IoT applications. Here’s how it works in simple terms:
- Publisher: A device that sends data (like a temperature sensor).
- Subscriber: A device that receives data (like a mobile app showing temperature).
- Broker: The middleman that manages communication between publishers and subscribers.
We’re going to build that Broker today using Raspberry Pi Zero W.
Why Use Raspberry Pi Zero W?
- Low cost: Very Economical
- Small footprint: Great for embedded or space-limited applications
- Built-in Wi-Fi: No need for additional hardware
- Low power consumption: Ideal for 24/7 operation
- Good community support: Tons of tutorials and help online
What You’ll Need
- Raspberry Pi Zero W -> The main board
- microSD card (8GB or more) -> For the OS and software
- Micro USB power supply -> To power the Pi
- USB to micro USB adapter -> For keyboard/mouse (optional if using SSH)
- HDMI adapter + monitor -> For first-time setup (optional)
- Wi-Fi connection -> Required for downloading software and update
Step 1: Prepare the Raspberry Pi
Download Raspberry Pi OS
Download the Raspberry Pi Imager from the official site and flash the Raspberry Pi OS Lite image (headless version) to your micro-SD card. The Lite version is ideal for this project as it consumes less memory and runs faster.
Enable SSH and Wi-Fi
After flashing:
- Open the SD card’s boot partition
- Create an empty file called
ssh(no extension) - Create a file called
wpa_supplicant.confwith the following content:
Change the country based on your location
country=US
ctrl_interface=DIR=/var/run/wpa_supplicant GROUP=netdev
network={
 ssid="Your_WiFi_Name"
 psk="Your_WiFi_Password"
 key_mgmt=WPA-PSK
}
Save and insert the card into the Raspberry Pi.
Step 2: Connect and Update
Power on the Raspberry Pi and connect via SSH (find IP from your router):
ssh pi@<your_pi_ip_address>
# default password: raspberry
Update and upgrade packages:
sudo apt update && sudo apt upgrade -y
Step 3: Install MQTT Broker (Mosquitto)
We’ll use Mosquitto, a lightweight and widely used MQTT broker.
sudo apt install mosquitto mosquitto-clients -y
sudo systemctl enable mosquitto
That’s it! You now have an MQTT broker running on your Raspberry Pi Zero W.
Step 4: Test the MQTT Broker
Local test on Pi itself:
Open two terminal sessions.
Subscriber Terminal
mosquitto_sub -h localhost -t test/topic
Publisher Terminal
mosquitto_pub -h localhost -t test/topic -m "Hello from Pi Zero!"
You should see the message appear in the subscriber window.
Step 5: Configure Security (Optional but Recommended)
While this step is optional for private networks, it’s good practice to enable authentication.
Add a password
sudo mosquitto_passwd -c /etc/mosquitto/passwd mqttuser
Enter your password when prompted.
Edit config
sudo nano /etc/mosquitto/mosquitto.conf
Add:
allow_anonymous false
password_file /etc/mosquitto/passwd
Restart the service:
sudo systemctl restart mosquitto
Now you’ll need to use the username and password for all clients.
Step 6: Related Projects
Raspberry Pi with MQTT Broker and Displaying Sensor Data on Node-RED Dashboard
Performance Tips
- Disable GUI or unnecessary services on your Pi to save memory.
- Use MQTT retained messages for data persistence.
- Regularly back up your configuration.
- Monitor logs using
sudo journalctl -u mosquitto

FAQs
Can I use a Raspberry Pi Zero (non-W)?
Yes, but you’ll need an external Wi-Fi dongle or Ethernet via USB.
Is Raspberry Pi Zero W powerful enough for a real-world broker?
Yes—for small to medium IoT setups (under 50 devices), it performs well. For larger deployments, consider Raspberry Pi 4.
What port does MQTT use?
By default, port 1883 (unencrypted) and 8883 (encrypted TLS). Use 1883 for basic local testing.
Is Mosquitto secure?
Not by default. Enable authentication and SSL/TLS for production environments.
Can I use this with Home Assistant?
Absolutely! Add your broker’s IP and credentials in Home Assistant’s MQTT integration settings.
How do I monitor or manage the broker?
Use command-line tools like mosquitto_sub and mosquitto_pub, or GUI’s like MQTT Explorer for desktop visualization.
Conclusion
You’ve just set up a low-cost, fully functional MQTT broker using the Raspberry Pi Zero W. This setup is ideal for beginners wanting to learn the foundations of IoT, and it serves as a powerful building block for smart home automation, sensor data collection, or even hobby robotics.
With this lightweight setup, you have a reliable message broker running 24/7 at minimal power and cost. As you expand your network of IoT devices, your knowledge and experience with MQTT will continue to grow. Hope you like this article on Building a Low-Cost MQTT Broker Using Raspberry Pi Zero W.
So, grab your Pi, start connecting devices and welcome to the world of IoT!
More Projects:
ESP32 based MAX30100 Pulse Oximeter Webserver
Connecting DS18B20 Sensor with Node-RED using Raspberry Pi
Building an RFID RC522 Access System with ESP32
What’s a Single Board Computer and Which One Is Right for Me?
Raspberry Pi Pico W with DHT11 Sensor and 16×2 LCD Display
Connecting BMP280 sensor with Raspberry Pi Pico W
Raspberry Pi Pico with LCD & SSD1306 OLED Display
Custom Android app with DS18B20 sensor and Raspberry Pi PICO W
Raspberry Pi Pico W web server with BMP180 sensor