DHT11 Data Logger using Raspberry Pi and Python code
In earlier projects we have seen how to connect DHT11 with raspberry Pi 3 and Pi 4. In this tutorial we will move a bit forward. We will use DHT11 Data Logger using Raspberry Pi and Python code. We will keep the DHT11 sensor data logged in a excel sheet with time.
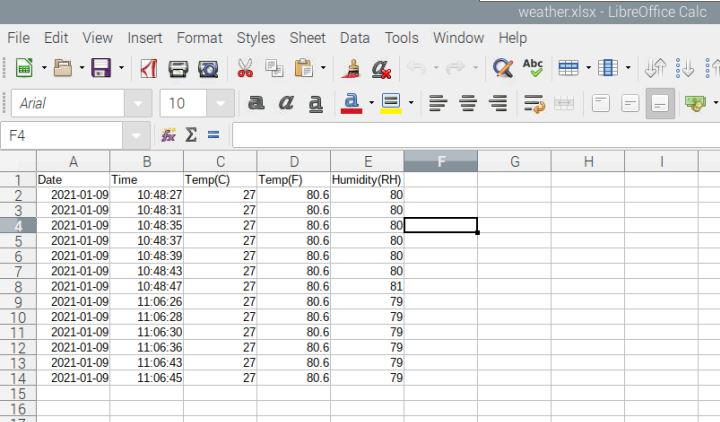
The excel will contain date, time, temperature in degree Celsius, temperature in degree Fahrenheit and relative humidity. If you want to keep a track of these data then you can use this project.
Parts List
For this tutorial you need few components. We except that you have you raspberry pi loaded with Raspbian OS and ready for use.
How it Works?
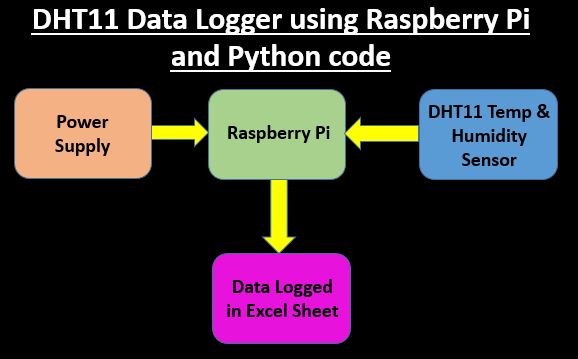
The working is simple to understand. DHT11 sensor is connected with raspberry pi. A python code runs which collects the data from the sensor and updates the same in a excel file with all the details.

Connection Diagram
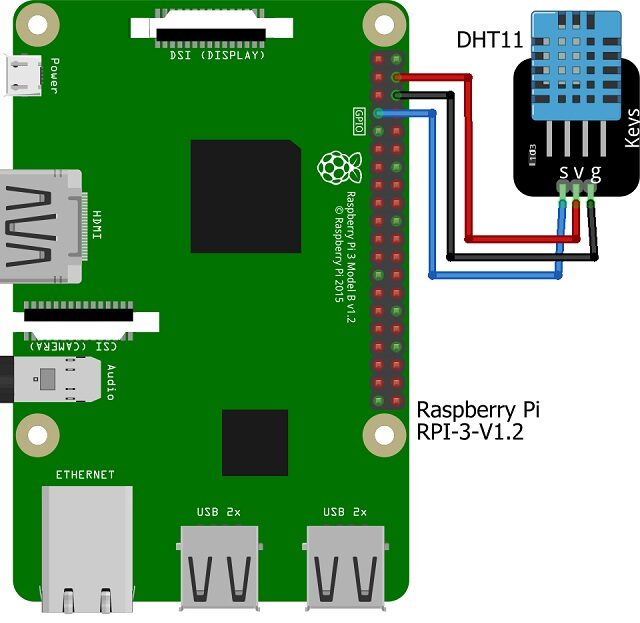
Connect the DHT11 sensor with Raspberry Pi as shown in figure below. Here we are using DHT11 module.

Prerequisites for code
Login to Raspberry Pi and open the terminal to execute below commands. If you have recently installed Raspbian OS then please run below commands to update the packages. If already updated then you may exclude the below commands.
sudo apt update
sudo apt upgrade
Run the below command to download Adafruit DHT python library from GIT Hub.
git clone https://github.com/adafruit/Adafruit_Python_DHT.git

Locate the downloaded folder in and go to Adafruit_Python_DHT folder
pi@raspberrypi:~ $ cd Adafruit_Python_DHT/
Run below command to install Python
pi@raspberrypi:~/Adafruit_Python_DHT $ sudo python setup.py install
Run below command to install Python version 3
pi@raspberrypi:~/Adafruit_Python_DHT $ sudo python3 setup.py install
Copy paste the below command to install openpyxl. Its a Python library to read/write Excel 2010 xlsx/xlsm files using python code.
pip install openpyxl

pip3 install openpyxl

Now its time to enable Remote GPIO
pi@raspberrypi:~ $ sudo raspi-config
Code
You can download the code and the preformatted excel file from the download link provided below. Unzip the zip file and copy it on a root location in your Raspberry Pi. Copy the dht11_excel folder in home\pi location along with DHT11.py file as well. The dht11_excel contains weather.xlsx file where the data gets logged.
- Controlling ESP32 via Bluetooth using Blynk
- Raspberry Pi PICO with Thonny IDE
- Interfacing Ultrasonic Sensor HC SR04 with Arduino Uno
- Interfacing MQ2 Gas Sensor with Arduino
- How to install Raspbian Lite on Raspberry Pi Zero W
- Connecting DHT11 Sensor with Raspberry Pi 4 / 3 using Python
- IoT based Timer Switch using Blynk and NodeMCU
Construction & Testing
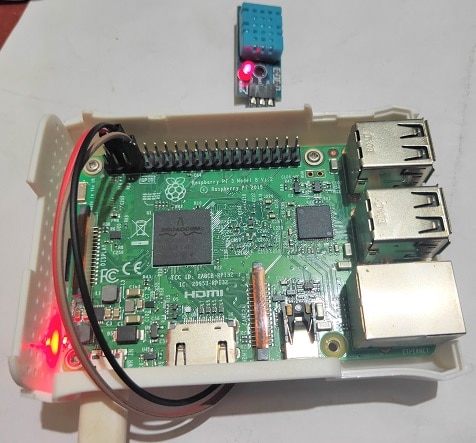
DHT11 connected with Raspberry Pi 3 as per the connection diagram and powered on.

To execute the code open terminal and execute the code python dht11.py on it. Now it will start showing the Temperature in degree Celsius, degree Fahrenheit and humidity. It will also get stored with date and time in excel sheet.

Once you stop the logging, open the excel file and you can see the temperature and humidity logged. This is the final output you can see with DHT11 sensor data logged with date and time.

Conclusion
This tutorial is for beginners who want to build temperature logger projects. In this tutorial we have used DHT11 sensor which is easily available in market and of low cost. Its a raspberry pi based temp logger with date and time. Please share your thoughts on this and share this article to spread the knowledge.

